Quick No-Knead Bread

Week Thirty-Nine: No-Knead Bread Week

quick-nkb-2

Okay, you’re sold on this whole “no-knead bread” thing.  You’re ready to try it out.  Problem is, you’re never in one spot long enough to make it through the whole twenty-odd hour process.  Or maybe you just want a homemade loaf of bread, but can’t be bothered to channel your inner Martha Stewart to get it.  Either way, what you need is no-knead bread, made fast.

Lucky for you, there’s an easy way to speed the process up: add more yeast.  The genius behind the original no-knead bread is the tiny bit of yeast used.  This little amount will leaven the bread, eventually – yeast will continue to grow and multiply forever, as long as the food supply and living conditions remain available and stable – but with no-knead bread, it takes the yeast so long to do that, it gives the dough ample opportunity to form a proper gluten network.  If you were to form the gluten by kneading instead, it would be highly over-developed by the time that little bit of yeast grew enough to actually leaven the dough.

But wait, you may ask, if we just add more yeast to no-knead bread, how does the gluten have enough time to form properly?  Well, unless you knead the dough, it won’t.  And since kneading would defeat the titular purpose of no-knead bread, I think that’s unacceptable.  So how do we get more gluten?

We add it.

Enter Vital Wheat Gluten, a substance that looks an awful lot like regular flour, but less powdery.  The name is actually a misnomer, since it’s not really gluten.  It’s simply wheat flour with most of the starch washed out, leaving mostly protein.  It’s these proteins that, when mixed with water, form gluten.  (For contrast, vital wheat gluten contains around 70% to 80% protein, compared to 10% to 12% in all-purpose flour).  Adding a bit of vital wheat gluten to no-knead dough makes for more gluten in less time, which means we can use less yeast.  Problem solved, right?

Almost.  Another issue with making bread quickly is that you generally lose flavor, as the enzymes and acids that make for the highly complex taste of great bread need time to develop.  So if we’re losing some of that flavor, we can turn to the old wives’ trick of adding a touch of white vinegar to the dough, which mimics the acidic taste of a long-rising sourdough.  I’m not joking; it really works.  It’s not perfect, but it certainly goes a long way towards helping the flavor of an otherwise lackluster dough.

So how does this fast no-knead bread turn out?  Impressively, is how.  It only took about 3 hours to rise the first time, as compared to 18 to 20 for the original no-knead bread.  I gave it about an hour for the second rise, not far off from the original recipe; by that time, the yeast was so active that the dough more than doubled in size.  This made for a very tall loaf, with plenty of open holes in the crumb.

The crust was comparable to the original recipe, that is, slightly thick, but pleasantly so, and not rock-hard.  The flavor, though, surprised me the most; I think it was much improved over the original.  It tasted creamy and complex, belying the speed and ease with which it was made.  I prefer this to the original no-knead bread on many levels: it’s faster, it tastes better, and it has a better texture inside.  What more could you want?

quick-nkb


Quick No-Knead Bread
Adapted from Jim Lahey, via The New York Times
Makes 1 round loaf

14 ounces (3 cups) unbleached bread flour, plus extra for dusting
1 tablespoon vital wheat gluten (see note 2 below)
1 teaspoon instant yeast
1¼ teaspoons salt
1½ cups water
1 teaspoon white vinegar

1.  In a large bowl, whisk together the flour, vital wheat gluten, yeast, and salt.  Add the water and vinegar, and stir until blended; the dough will be shaggy and sticky.  Cover tightly with plastic wrap, and let dough sit at room temperature for 3 to 4 hours, or until very risen and bubbly.

2.  Line a 10 inch skillet or any wide, shallow bowl with a large square of parchment paper.  Turn the dough out onto a well-floured work surface; sprinkle it with a little more flour and fold it over on itself a few times, until it forms a roughly round shape.  A bench scraper helps greatly with this step.

3.  Transfer the dough to the parchment-lined skillet, and dust heavily with wheat bran or additional flour.  Cover loosely with plastic wrap and let rise until doubled in size, about 1 to 1½ hours.  When it is ready, the dough will not readily spring back when poked gently with a fingertip.

4.  At least 30 minutes before baking, preheat the oven to 450º F.  Put a 6- to 8-quart heavy covered pot (see note 1 below) in oven as it heats.  When the dough is ready, carefully remove the pot from the oven.  Transfer the dough to the pot by lifting the parchment by the edges, and carefully and quickly lowering the dough into the pot.  Shake the pan once or twice if dough is unevenly distributed, but don’t worry about it too much; it will straighten out as it bakes.

5.  Cover the pot with the lid, and bake at 450º F for 30 minutes.  Remove the lid and bake uncovered for an additional 15 to 30 minutes, or until the loaf is well-browned.  An instant-read thermometer should register around 205º to 210º F when fully baked.  Transfer to a wire rack to cool thoroughly, discarding the parchment.


Notes:
1.  Any heavy covered pot will do, be it cast iron, enamel, Pyrex, stainless steel, or ceramic.  As long as it’s oven-safe, it seems anything will do the trick.  If your chosen vessel has no lid, or if you’re concerned about the oven-safety of it, simply use aluminum foil instead, pressing it tightly (and carefully) around the preheated pot.

2.  Vital wheat gluten may be found at some natural or health food grocery stores (such as Whole Foods), specialty baking shops, or online at King Arthur Flour or Amazon.  I used Bob’s Red Mill brand.

Posted in Savory, Yeast Breads | Leave a comment

100% Whole Wheat No-Knead Bread

Week Thirty-Nine: No-Knead Bread Week

ww-nkb-1

[Oh my goodness, you guys!  I’m finally caught back up!]

Fixated as this nation is on whole-grain anything, the most logical variation on no-knead bread is to make a whole wheat version.  Normally, I would never try to adapt a white bread recipe to whole wheat by simply swapping all the white flour for whole wheat flour; this almost always results in a dense, flat bread, more suited to propping a door open than to eating.

The technical reasons are important here.  Whole wheat flour retains the bran of the wheat kernel, which essentially means that there are sharp little flakes in your dough.  As you knead, these sharp bits of bran act like tiny knives, cutting the gluten as it forms, under the pressure of your hand or dough hook.  Since it is the network of gluten that traps air in dough (giving you those lovely holes in the loaf), the lack of gluten means there is less air, meaning your bread comes out dense.

But!  In no-knead bread, the gluten isn’t formed by kneading, but by time and natural dough fermentation processes.  Ergo, if using whole wheat flour in a bread that requires no kneading, the gluten should gently form around the bran, as there is no pressure to force the bran through the gluten strands.  And when you do finally shape the loaf, the bran should have softened enough by absorbing water that it wouldn’t have the same knifely ability.

So, armed with this hypothesis, I swapped all the white flour for whole wheat.  Everything else stayed the same: yeast, salt, water, rising time, baking temperature, everything.  Result?

Good and not-so-good.  The good part was that I was right about the gluten and bran; there were indeed some very lovely holes in the crumb, bigger than you’d certainly expect from a 100% whole wheat bread.  But the not-so-good part was the flavor.  The lack thereof, actually.  The woeful lack thereof.  Familiar with the taste of wet cardboard?  You will be, after eating this bread.

The color turned an odd purpley shade (I don’t remember adding blueberries…), and the oven-spring was, shall we say, inadequate.  True, this flat, grayish bread did have a pleasant texture: barely coarse at all (though I do love a rustic, grainy bread), quite moist, with an appropriately sturdy crust.  But unless you’ve got ageusia and also happen to be blind, I don’t think you’ll appreciate this one much.

It’s not surprising that it reminded me of those ill-fated loaves of Grant Bread from a few weeks back; the methods are quite similar, though that recipe used more yeast.  Apparently, whole grain breads need something more than time and patience, which alone will improve nearly any white bread recipe.  This challenge certainly requires more study and perhaps a new approach; surely it can’t be that difficult to make a good no-knead whole grain bread.

Can it?

ww-nkb-2


100% Whole Wheat No-Knead Bread
Adapted from Jim Lahey, via The New York Times
Makes 1 round loaf

13½ ounces (3 cups) whole wheat flour, plus extra for dusting
1/4 teaspoon instant yeast
1¼ teaspoons salt
1½ cups water

1.  In a large bowl, whisk together the flour, yeast, and salt.  Add the water, and stir until blended; the dough will be shaggy and sticky.  Cover tightly with plastic wrap, and let dough sit at room temperature for at least 12 and up to 24 hours (but preferably about 18).

2.  The dough is ready when its surface is dotted with bubbles.  Line a 10 inch skillet or any wide, shallow bowl with a large square of parchment paper.  Turn the dough out onto a well-floured work surface; sprinkle it with a little more flour and fold it over on itself a few times, until it forms a roughly round shape.  A bench scraper helps greatly with this step.

3.  Transfer the dough to the parchment-lined skillet, and dust heavily with wheat bran or additional flour.  Cover loosely with plastic wrap and let rise until doubled in size, about 2 hours.  When it is ready, the dough will not readily spring back when poked gently with a fingertip.

4.  At least 30 minutes before baking, preheat the oven to 450º F.  Put a 6- to 8-quart heavy covered pot (see note 1 below) in oven as it heats.  When the dough is ready, carefully remove the pot from the oven.  Transfer the dough to the pot by lifting the parchment by the edges, and carefully and quickly lowering the dough into the pot.  Shake the pan once or twice if dough is unevenly distributed, but don’t worry about it too much; it will straighten out as it bakes.

5.  Cover the pot with the lid, and bake at 450º F for 30 minutes.  Remove the lid and bake uncovered for an additional 15 to 30 minutes, or until the loaf is well-browned.  An instant-read thermometer should register around 205º to 210º F when fully baked.  Transfer to a wire rack to cool thoroughly, discarding the parchment.


Notes:
1.  Any heavy covered pot will do, be it cast iron, enamel, Pyrex, stainless steel, or ceramic.  As long as it’s oven-safe, it seems anything will do the trick.  If your chosen vessel has no lid, or if you’re concerned about the oven-safety of it, simply use aluminum foil instead, pressing it tightly (and carefully) around the preheated pot.

Posted in Savory, Yeast Breads | 9 Comments

Original No-Knead Bread

Week Thirty-Nine: No-Knead Bread Week

nkb

Oh, you knew it was coming sooner or later.  Did anyone really think I was going to go the whole year without acknowledging the biggest ever stir in the breadmaking blogosphere, the phenomenon (to use a tired descriptor) that launched a million ovens to unexplored panary shores?  Feh.

Does the world really need another treatise on no-knead bread?

No.  No, it does not.

*Gallic shrug*

It was quite amazing, the reaction to this simple recipe.  Within days of publication, hundreds of no-knead posts appeared across the internet, and that Thanksgiving in New York City, there was a run on Dutch ovens and instant yeast that lasted through Christmas.  My own father sent me the recipe, a man who has about as much interest in baking his own bread as a cat does: they might enjoy it very much, but it’s probably not going to happen.

No-knead bread got people baking, people who never thought they could bake bread in a million years.  But for every encouraged and justly-proud novice, there was a mean-spirited epicure in the background, sniffing above all the hubub, “It’s not that good.”

And really, when you get right down to it, that little snit has a point.  Don’t get me wrong, I think no-knead bread is fabulous for what it’s done, for the quality of bread it has brought to American home cooking.  But objectively speaking, perhaps the crust might be a mote too thick, perhaps the crumb could be more open, perhaps the flavor could be a bit more complex.  All these nitpicky things aside, you will perhaps never find a bread so easy to make that produces such excellent results.

nkb-2

Enough has been written about the characteristics of this bread, so I’ll spare you that much.  (Is anyone reading this blog really a stranger to no-knead bread?)  I have made modifications to the original recipe, namely that I use parchment instead of cloth as a couche for the dough to rise on.  Maybe I’m the only one, but I never seem to have luck rising bread on fabric, no matter how heavily floured.  It always sticks.  So I use parchment instead, which here has the added benefit of not having to flip fragile risen dough upside down into the precise center of a 450º F pot.  Forgive my impudence, but I can’t really imagine why you’d do it any other way.

Today, I’m featuring the original no-knead bread, with the aforementioned change in technique.  In the following days, I’ll discuss variations on that theme, for those of you who (like me) just can’t resist fixing what ain’t broke.  Stay tuned!

nkb-3


Original No-Knead Bread
Adapted from Jim Lahey, via The New York Times
Makes 1 round loaf

14 ounces (3 cups) unbleached bread flour, plus extra for dusting
1/4 teaspoon instant yeast
1¼ teaspoons salt
1½ cups water

1.  In a large bowl, whisk together the flour, yeast, and salt.  Add the water, and stir until blended; the dough will be shaggy and sticky.  Cover tightly with plastic wrap, and let dough sit at room temperature for at least 12 and up to 24 hours (but preferably about 18).

2.  The dough is ready when its surface is dotted with bubbles.  Line a 10 inch skillet or any wide, shallow bowl with a large square of parchment paper.  Turn the dough out onto a well-floured work surface; sprinkle it with a little more flour and fold it over on itself a few times, until it forms a roughly round shape.  A bench scraper helps greatly with this step.

3.  Transfer the dough to the parchment-lined skillet, and dust heavily with wheat bran or additional flour.  Cover loosely with plastic wrap and let rise until doubled in size, about 2 hours.  When it is ready, the dough will not readily spring back when poked gently with a fingertip.

4.  At least 30 minutes before baking, preheat the oven to 450º F.  Put a 6- to 8-quart heavy covered pot (see note 1 below) in oven as it heats.  When the dough is ready, carefully remove the pot from the oven.  Transfer the dough to the pot by lifting the parchment by the edges, and carefully and quickly lowering the dough into the pot.  Shake the pan once or twice if dough is unevenly distributed, but don’t worry about it too much; it will straighten out as it bakes.

5.  Cover the pot with the lid, and bake at 450º F for 30 minutes.  Remove the lid and bake uncovered for an additional 15 to 30 minutes, or until the loaf is well-browned.  An instant-read thermometer should register around 205º to 210º F when fully baked.  Transfer to a wire rack to cool thoroughly, discarding the parchment.


Notes:
1.  Any heavy covered pot will do, be it cast iron, enamel, Pyrex, stainless steel, or ceramic.  As long as it’s oven-safe, it seems anything will do the trick.  If your chosen vessel has no lid, or if you’re concerned about the oven-safety of it, simply use aluminum foil instead, pressing it tightly (and carefully) around the preheated pot.

2.  If you don’t have bread flour on hand, you can certainly use all-purpose flour in its place.  In that case, you should use 13½ ounces instead (which still measures 3 cups).

Posted in Savory, Yeast Breads | Leave a comment

Hazelnut Fig Bread

Week Thirty-Eight: Spanish Breads

hazelnut-fig-2

We end this week with a recipe that, while not strictly Spanish in origin, carries itself with a decidedly Spanish air.  This is a slightly dry and firm bread, perfect for stacking with whatever delicacies you might have around.  Studded indulgently and effortlessly with whole hazelnuts and quartered figs, this bread speaks to the unfussy and hospitable Spanish nature.

The use of figs gives a nod to the traditional fig cakes (pan de higo) often served as tapas, while the use of hazelnuts instead of the more expected Marcona almonds not only tastes brilliant, but also highlights Spain’s position as the world’s third-largest exporter of the nut.

The buttery crunch of the hazelnuts and the delicate pop of fig seeds bring a welcome texture to the grainy bread; it’s good enough on its own, but adds a little something special when paired with some topping.  In addition to the jammy wine flavor of the figs and the earthy hazelnuts, this bread is spiked with the astringent licorice notes of fennel seeds and the bright pine of rosemary, rounding out and balancing the overall taste of each slice.

Paper-thin jamón Serrano and generous slabs of queso Manchego are both no-brainers to pair with this, as is a bottle of good Spanish wine.  There are many excellent and inexpensive Spanish wines readily available these days; I particularly enjoyed the bottle of blended Cabernet Sauvignon and old-vine Garnacha that I picked up for a mere $10.  The hit of plum and berry flavors matched the figs quite well, and the sturdiness of Cabernet gave it enough muscle to stand up to the salty pork I served alongside.

And so we bid Spain a fond farewell, (mostly) back on schedule with posting, and with a mind (and belly) full of new recipes to enjoy in the future.  Sentimental?  Sure.  But if you’d have tried most of these breads, you’d be sentimental too.

hazelnut-fig-1


Hazelnut Fig Bread
Adapted from Apple Pie, Patis, & Pâté
Makes 2 medium loaves

10½ ounces (a scant 2½ cups) whole wheat flour
10½ ounces (2¼ cups) unbleached bread flour
2 teaspoons salt
1 teaspoon instant yeast
15 ounces (2 cups minus 2 tablespoons) water, at room temperature
1 tablespoon fennel seeds
2 teaspoons dried rosemary (or 1 tablespoon fresh)
2/3 cup whole hazelnuts, toasted, skins removed, and cooled (see note 1 below)
2/3 cup dried figs, stems removed, quartered

1.  In the bowl of a stand mixer, whisk together all but a handful of both flours, the salt, and the yeast.  Add the water.  Using the dough hook, mix until a rough dough forms, and all the flour is moistened.

2.  Increase the speed to medium-low, and knead for 6 to 8 minutes, or until the dough is smooth and elastic.  Add the reserved flour as needed until the dough is moderately stiff and no longer sticky; it should clear the sides of the bowl.

3.  Add the fennel seeds and rosemary, and knead on low speed until evenly distributed.  Add the hazelnuts and figs, and mix just until integrated into the dough.

4.  Turn the dough out onto a work surface and knead until the hazelnuts and figs are evenly incorporated, dusting with flour only as needed to prevent sticking.  Transfer the dough to a large, lightly oiled bowl.  Cover tightly with plastic wrap, and let sit at room temperature until nearly doubled in size, about 45 to 60 minutes.

5.  Remove the plastic wrap and, using a broad nonstick spatula, fold the dough over itself, as though you were folding a letter: 1/3 over the center, then the opposite 1/3 over that.  Lastly, fold dough in half again, perpendicular to the first folds (like you’re folding the letter in half).  The dough should end up being roughly a square.

6.  Replace the plastic wrap, and let dough rise at room temperature until nearly doubled in size again, about 45 to 60 minutes more.

7.  Turn the dough out onto a lightly-floured work surface, and gently press to deflate.  Divide the dough into two equal halves, and shape each into a round ball.  Cover loosely with plastic wrap, and let rest 10 minutes.  Lightly grease a baking sheet, or line with parchment.

8.  Shape each piece of dough into an oval loaf by lightly pulling the outside around into the center of the dough, forming a tight skin around the loaf.  Some figs or hazelnuts may poke through.  Transfer each loaf to the prepared baking sheet, seam side down.  Cover loosely with plastic wrap, and let sit at room temperature for 45 to 60 minutes, or until doubled in size.  Preheat the oven to 475º F.

9.  Using a sharp serrated knife, and as little pressure as possible, make a decisive slash lengthwise along the top of each loaf.  Spray or sprinkle dough with water, and transfer to the oven.  Bake at 475º F for 10 minutes, opening the door to spray with water every 2 minutes.  Reduce the oven temperature to 425º F, and continue to bake for about 30 minutes more, or until deep golden brown, and a thermometer inserted into the center of the loaf reads 200º F (being careful not to insert the thermometer into a fig).  Remove loaves to a wire rack to cool completely before slicing.


Notes:
1.  To toast and skin raw hazelnuts, spread in a single layer on a baking sheet.  Roast at 350º F, shaking or stirring every 5 minutes, for 10 to 15 minutes, or until fragrant and golden.  Do not let burn or over-brown.  When slightly cooled, rub between hands to remove the skins, which should slip off easily.  Those that don’t are okay to leave on.

Posted in Savory, Sweet, Yeast Breads | Leave a comment

Barra de Pan

Week Thirty-Eight: Spanish Breads

barra-1

The baguette, in France, is a highly regimented object.  Under the austere and unyielding eye of the law, baguettes must be made to exact specifications in size, weight, and composition – which, of course, vary according to whatever city you happen to be in, as one might expect from the precise and laissez-faire French.

In Spain, the baguette is no less popular than in France – as one might expect from two neighboring countries both so appreciative of the gastronomic arts – but the Spanish are far more forgiving of variation.  The Spanish barra de pan is not so specific a thing as the French baguette, though it is no less delicious.  It does tend to be a bit drier and harder, more suited to eating with other foods (saucy mussels come immediately to mind), where the French version is meant to be savored of its own right.

I think I will be forgiven, then, if I adapt a baguette recipe to mimic the barra de pan.  This recipe takes at least two days, but the efforts are minimal, and the result is certainly worthy of any table.  With its creamy interior and firm crust, this barra makes an ideal base for a food I introduced in yesterday’s post, pa amb tomàquet.

Normally, I wouldn’t ever mention a dish two days in a row.  But it really, really is that amazing.  I don’t remember the last time I made so simple a dish, that was so much fun to eat, that resulted in such eye-rolling, guttural-noise-inducing bliss.  And the almost buttery flavor of this barra de pan, the rare hallmark of a well-crafted bread, sets off the tartly sweet flavor of a just over-ripe tomato perfectly.  An even hand with the olive oil, and a sparkle of salt on top, and I was in heaven.

This bread was good enough on its own.  In fact, it may be one of the better breads I’ve made this year.  But with those farmer’s market tomatoes, resplendent and vibrant, it was far more than just bread.  It was savoring, it was smelling, it was crunching, it was reminiscing, it was love.  It was why I started this project in the first place.

barra-2

Barra de Pan
Adapted from The Bread Baker’s Apprentice, by Peter Reinhart
Makes 3 loaves

For the starter:
3 3/4 ounces (about 3/4 cup) unbleached bread flour
1/12 teaspoon instant yeast (a large three-fingered pinch)
1/2 cup water, at room temperature

For the final dough:
16 ounces (about 3 1/3 cups) unbleached bread flour
1 ounce (about 1/4 cup) whole wheat flour
1 1/2 teaspoons salt
1 teaspoon instant yeast
1 cup plus 2 tablespoons (9 ounces) water, at room temperature

1.  To make the starter, whisk all ingredients together.  The mixture should have the consistency of thick pancake batter; add more water or flour as necessary to achieve the proper thickness.  Cover loosely, and let stand at room temperature for 3 to 4 hours, or until bubbly.  Cover tightly, and refrigerate for at least 8 hours or up to 3 days.  When ready to continue, let stand at room temperature for 1 hour before proceeding.

2.  In the bowl of a stand mixer, whisk together the flours, salt, and yeast.  Add the water and all of the starter.  Using the dough hook, mix at low speed until all flour is moistened, and a rough dough forms.

3.  Increase the speed to medium-low, and knead until smooth and supple, about 6 minutes longer.  Add extra flour as needed to adjust the consistency; the dough should be slack, but should not be soupy.

4.  Transfer the dough to a large, lightly-oiled bowl.  Cover tightly with plastic wrap and let stand at room temperature for 2 hours, or until doubled in size.

5.  Uncover the dough and, using a nonstick spatula, fold the dough over itself in a tri-fold, as though you were folding a letter.  Then, fold dough in half again, perpendicular to the first folds (like you’re folding the letter in half).  Dough should end up being roughly a square.  Cover again, and let rise an additional 2 hours.

6.  Lightly oil a large baking sheet, or line with parchment paper.  Turn the dough out onto a well-floured surface, being careful to deflate it as little as possible.  Using a bench scraper, cut the dough into three long pieces.  With floured hands, shape each into a long baguette.  Carefully transfer each to the prepared baking sheet, seam-side down.  Cover loosely with lightly-oiled plastic wrap, and let sit at room temperature until doubled in size, about 50 to 60 minutes.  Preheat the oven to 500º F.

7.  Using a sharp serrated knife, quickly and lightly slash the loaves 4 or 5 times each, on a diagonal.  Spray or sprinkle the dough lightly with water, and transfer immediately to the oven.  Bake at 500º F for 2 minutes, opening the door to spray the dough with water every 30 seconds.  Reduce the temperature to 450º F, and bake for an additional 20 minutes or so, checking the bread after 15 minutes.  The bread should be well-browned, and an instant-read thermometer should register around 205º F when inserted into the center.  Remove to a wire rack to cool thoroughly before slicing.

Pa Amb Tomàquet (Bread With Tomato)

Slices of crusty bread
1 clove garlic (optional)
Very ripe fresh tomatoes
Coarse salt
Good quality extra-virgin olive oil

1.  Slice the bread, and toast it lightly under a hot broiler.

2.  If using, cut the garlic in half horizontally, and rub it over the bread.

3.  Cut the tomato in half horizontally, and rub it over the bread until the bread is very stained, and the tomato is reduced to a shell of its former self.

4.  Sprinkle the bread with a little salt, drizzle lightly with olive oil, and serve immediately, perhaps with some Serrano ham, anchovies, Manchego cheese, or canned tuna.

Notes:
1.  The barra de pan will keep at room temperature for about a day.  If not eating within that time, it should be frozen, tightly wrapped, and reheated in a 350º F oven for about 5 minutes, or until heated through.

2.  Again, for the pa amb tomàquet, use fresh tomatoes, not canned.  The Spanish will come and get you in the night if you even think about using canned.  It is best if the tomatoes are just over-ripe, and slightly soft; firm tomatoes won’t soak into the bread nearly as well.

Posted in Savory, Yeast Breads | Leave a comment

Pan Gallego de Centeno (Galician Rye Bread)

Week Thirty-Eight: Spanish Breads

pan-gallego-1

In Spain, loaves of bread are often gargantuan things, as big around as a large paella pan.  Richly brown as any chocolate, they’re sold in quarters or halves, but just as commonly sold whole.  This is not only a reflection of the Spaniard’s unwavering adoration of the pan diario, but also has historical connotations.

Just as in many bread-baking societies, ovens in Spain were once communal.  Large loaves made for extra time between baking sessions, and also generally tasted much better than smaller loaves.  Poorer people, of necessity, used whatever grains they could, which often meant using a large percentage of whole-wheat or non-wheat flours.  And the Spanish, being the culinary innovators they are, figured out how to make those loaves taste pretty darn good.

Enter pan Gallego, or “bread of Galicia”, the North-westernmost province in Spain.  Recipes for this toponymous bread differ as much as the type of wine served alongside, but this version uses a large percentage of centeno, or rye flour, which certainly would’ve been common in bygone ages.  Caraway seeds and a touch of olive oil add earthiness and fruit to complement the rye, while a handful of cornmeal gives a nod to the proximity of Galicia to Portugal, a country that grows a substantial amount of corn.

pan-gallego-4

To mitigate the coarse texture and slightly bitter flavor of rye, an unleavened rye starter is left to ferment for up to a day, softening texture and taste.  This long fermentation also helps increase its keeping ability, important when baking such huge loaves as this.  Giant as this bread is, I don’t suggest baking it into smaller portions.  Long and technical story short, the size greatly affects and improves the flavor and texture of the bread, leaving authenticity aside.

The slack dough transforms into a brown-crusted, homely-looking thing; but inside is an impossibly tender, airy crumb, especially considering the significant percentage of coarse whole grains used.  The unmistakable flavor of rye and caraway are there, but are swaddled in overtones of slight sourness, and an impeccable tooth.

pan-gallego-3

Lest you think I’m recommending you make a truly massive loaf of bread for no reason other than ars gratia artis, let me tell you about pa amb tomàquet.  This Catalonian specialty is sometimes mistakenly referred to as “Catalan bruschetta”; but if there’s a Spaniard within spitting distance, he’ll surely let you know your error.

As might be expected, there are about ten million different ways (each and every one the only and most proper way, of course) of making pa amb tomàquet.  But generally, it consists of toasting a slice of bread, rubbing with a clove of garlic (à la bruschetta), then not so much rubbing as squishing, scraping, or scrubbing a tomato half into the toast, until only the skin is left.  (Most say to discard this skin, but I found it irresistible; of course, Americans don’t breed thick-skinned tomatoes especially for this purpose as the Spanish do.)  Coarse salt is sprinkled on top, and only then is a light drizzle of olive oil added, lest the bread soak up anything but tomato at first.

Such a simple idea, such facile execution, but what immensely complex flavors result!  It’s actually astonishing how good it is, especially now, with those last, sweet, tomato hurrahs of summer, and such a fantastic loaf of bread as this pan Gallego.  No, I’m not suggesting you make an entire loaf of pan Gallego; I’m suggesting you make an entire pan Gallego’s worth of pa amb tomàquet.

Let me know if you have any bread left over.

pan-gallego-2

all I had was a yellow tomato, but I assure you, it's on there


Pan Gallego de Centeno (Galician Rye Bread)
Adapted from Apple Pie, Patis, & Pâté
Makes 1 large loaf

For the starter:
9½ ounces (about 2½ cups) white rye flour (see note 1 below)
2¼ ounces (a scant 1/2 cup) cornmeal, preferably stone-ground
2 ounces (a scant 1/2 cup) whole wheat flour
1/2 teaspoon salt
1¼ cups water, at room temperature

For the final dough:
16 ounces (3¼ cups plus 1 tablespoon) unbleached bread flour
4 teaspoons instant yeast
2 teaspoons salt
9 ounces water, at room temperature
2 tablespoons olive oil
2 teaspoons caraway seeds

1.  To make the starter, whisk the rye flour, cornmeal, whole wheat flour, and salt together in a bowl.  Add the water, and stir until all the dry ingredients are moistened.  The mixture should be thick, but not very stiff.  There should not be any flour left dry; if there is, add a spoonful or two of extra water and mix to combine.  Cover tightly with plastic wrap, and let stand at room temperature for at least 12 and up to 24 hours.

2.  To make the final dough, whisk together the flour, salt, and yeast in the bowl of a stand mixer.  Add the water and olive oil, and mix with the dough hook on low speed until smooth, about 2 to 3 minutes.

3.  Add the starter in pieces, mixing on low speed to help each piece incorporate, until all starter has been added and the mixture is reasonably homogenous.  Increase the speed to medium-low, and knead until smooth and elastic, about 5 to 6 minutes.  The dough will be slack, and will not clear the sides of the bowl, but should form strands from the dough hook to the bowl as you mix.

4.  Add the caraway seeds, and mix on low speed until incorporated.  Transfer the dough to a large, lightly-oiled bowl.  Cover tightly with plastic wrap, and let sit at room temperature until 1½ times larger in volume, about 45 to 60 minutes.

5.  Lightly grease a large baking sheet, or line with parchment paper.  Turn the dough out onto a well-floured work surface.  Dust the top of the dough with flour, and, using floured hands, gently deflate the dough and shape into a flat round.  Fold the edges into the middle, pressing gently but firmly, shaping the dough into a round loaf.  Transfer the dough to the prepared baking sheet, seam side down.  Cover loosely with lightly-oiled plastic wrap, and let sit at room temperature until doubled in size, about 1 hour.  Adjust an oven rack to the lower-middle position, and preheat the oven to 475º F.

6.  Spray or sprinkle the loaf with water, then transfer to the oven.  Bake at 475º F for 10 minutes, opening the door every 2 minutes to spray with additional water.  After 10 minutes, reduce the temperature to 425º F, and bake for 15 minutes more, without spraying.  Next, reduce the temperature again, to 350º F, and bake for an additional 30 to 40 minutes, or until well-browned and baked through.  An instant-read thermometer should register about 200º F when inserted into the center.  Remove to a rack to cool completely before slicing.


Pa Amb Tomàquet (Bread With Tomato)

Slices of crusty bread
1 clove garlic (optional)
Very ripe fresh tomatoes
Coarse salt
Good quality extra-virgin olive oil

1.  Slice the bread, and toast it lightly under a hot broiler.

2.  If using, cut the garlic in half horizontally, and rub it over the bread.

3.  Cut the tomato in half horizontally, and rub it over the bread until the bread is very stained, and the tomato is reduced to a shell of its former self.

4.  Sprinkle the bread with a little salt, drizzle lightly with olive oil, and serve immediately, perhaps with some Serrano ham, anchovies, Manchego cheese, or canned tuna.


Notes:
1.  If using medium rye flour and measuring by volume, add an extra tablespoon to total 9½ ounces.  Pumpernickel rye flour, though, should still measure 2½ cups.

2.  This bread should keep at room temperature for several days in an air-tight container.  Re-crisp by heating in a 350º F oven for 3 to 4 minutes.

3.  A “cheater’s method” for pa amb tomàquet, which prevents the bread from going soggy as it sits, from Lobstersquad: Cut the tomatoes in half, and grate them into a bowl.  Add salt and olive oil to the tomato pulp, to taste.  Serve with toasted bread, rubbed with garlic or not according to preference, and a knife for spreading.

4.  Pa amb tomàquet should be made with a very soft, very ripe tomato.  In Spain, canned tomatoes are blasphemy in this application; but if it’s winter, and you’re really craving some of this, I wouldn’t say a word to anyone.

Posted in Savory, Yeast Breads | 4 Comments

Ensaïmadas

Week Thirty-Eight: Spanish Breads

ensaimada

The sun is just up, beginning to turn the dusty light a flattering shade of terra cotta.  The patisseria offers, among many other things, an ensaïmada; but the small, sweet spiral is all you care to breakfast on after dining so well and so late the night before.  Careful to avoid inhaling the powdery dusting of sugar, your teeth sink through the outer crust into the soft interior.   But you can’t avoid losing a few motes of sugar, as the bread resists your bite, pulling at your hand and letting go in slow layers.

The dough, sweet and rich, is made richer yet by being rolled up with pork fat before being coiled into the snail shell shape.  It isn’t quite as indulgent as it might sound; it’s simply the pork-addicted Mallorcan’s answer to the croissant, and is very nearly as light.  Gleaming, the sweet topping proves an effective antidote to the salt of Mediterranean air.

You finish, the middle of the spiral saved for last as the best bite of all, and savor the sweetness licked from each finger with eyes closed.  Bitter dregs of now-lukewarm coffee rinse the flavor from your palate, and the idea of going back for a second ensaïmada tempts you, and strongly.  But the lure of the warming and ever more crowded sand is stronger, and you decide against it.  You might be on an island, but you’re still in Spain after all, and there will always be another piece of bread to enjoy around every vibrant corner.

This recipe is a rather bastardized version of the far more elaborate and lardy (literally) version found in Mallorca, resulting in an item that is more bread than pastry.  The overall effect, though, is quite pleasant, if less than authentic.


Ensaïmadas
Adapted from Bread, by Christine Ingram and Jennie Shapter
Makes 16

1 large egg, at room temperature
1/2 cup milk, at room temperature
1 tablespoon olive oil
9½ ounces (2 cups) unbleached bread flour
1/4 cup sugar
1/2 teaspoon salt
1½ teaspoons instant yeast
3 tablespoons unsalted butter, melted
Powdered sugar, for dusting

1.  In the bowl of a stand mixer, whisk the egg until well blended.  Add the milk and oil, and whisk until combined.  Add the flour, sugar, salt, and yeast.  Using the dough hook, mix at low speed until all the flour is moistened and a rough dough forms.  Increase the speed to medium-low and knead for about 5 minutes, or until smooth and elastic.

2.  Transfer the dough to a lightly-oiled bowl, cover tightly with plastic wrap, and let sit at room temperature until nearly doubled in size, about 1 to 1½ hours.

3.  Turn the dough out onto an un-floured work surface.  Knead a few times to deflate, dusting lightly with flour as needed to prevent sticking.  Divide the dough into 16 even pieces, cover loosely with plastic wrap, and let rest for 5 minutes.  Line a large baking sheet with parchment paper.

4.  Keeping unused pieces of dough covered, roll each piece of dough out into a thin rope, about 15 inches long.  If the dough resists, cover and let rest while working on remaining pieces.

5.  When all pieces are rolled out, dip each one in the melted butter, letting any excess drip off.  Coil each rope into a spiral, on the prepared baking sheet.  Tuck the tail end underneath.  Repeat with remaining ropes.  Cover loosely with plastic wrap, and let sit at room temperature until doubled in size, about 1 hour.  Preheat the oven to 375º F.

6.  Bake the spirals at 375º F for 10 to 15 minutes, or until golden brown.  Remove from the oven and immediately dust with powdered sugar, ideally by sifting the sugar over the hot bread.  Transfer to a wire rack to cool.  Serve warm.


Notes:
1.  Ensaïmadas will keep at room temperature for about a day.  They may also be frozen and reheated in a 350º F oven for about 5 minutes, or until heated through.

Posted in Sweet, Yeast Breads | 3 Comments

Picos

Week Thirty-Eight: Spanish Breads

picos-1

When tapas burst onto the American dining scene a few years back, they confused as many people as they enthralled.  It was as if a mass forgetfulness had taken hold, as trendy restaurants from New York to Los Angeles obviously forgot to print the “entrée” sections of the menus they handed their patrons.  Appetizers only?  Really?

Fortunately, the befuddlement subsided as diners grew more accustomed to the charming trend of “small plates”, which encourage sharing and tasting many different items, rather than ordering one substantial offering per person.  But American tapas are a bit different from their Spanish progenitors.  In Spain, where dinner is usually served from 10 pm to midnight, tapas are most often eaten in late afternoon for the mereinda, or after-work snack; whereas Americans most often eat their tapas as an entire meal.

Wine and tapas go hand-in-hand, not only because of the thrilling and endless wine-pairing possibilities inherent, but also because tapas were originally created in conjunction with wine drinking.  There are as many stories about the origins as there are types of tapas, but it’s generally said that glasses of wine or sherry began to be served with a covering (or tapa) of some sort, either a plate or a slice of good cured ham depending on the tale, in order to keep fruit flies from plunging happily into the sweet-smelling beverage.  Bars and restaurants in competition began turning out better and more elaborate versions, until tapas became the phenomenon that they are today.

Tapas are typically divided into hot and cold categories, and can be as simple as a plate of olives or as elaborate as any entrée.  Regional specialties are usually showcased, such as sliced cured ham in Salamanca, octopus in Galicia, or Manchego in La Mancha.  But no matter where you are in Spain, or what you’ve decided to nibble at over your Rioja, you’ll always find bread served alongside.

That’s where today’s bread comes in.  Picos are hard little breadsticks that look rather like fat, miniature baguettes.  The name “pico” means “beak”, and they do look a bit like a bird’s beak, especially after one too many glasses of jerez.  They can be served alone, much like peanuts at American bars, or with some sort of dip or spread, such as tapenade.  Served with a slice of jamón ibérico, they’re painfully addictive.

I’ve used toasted and ground sesame seeds in this recipe, which is perhaps less than traditional for picos in general, but the result was so flavorful, I wouldn’t suggest trying them any other way.  The sesame seeds bring a unique nutty, almost acidic, quality to the dough, but remains as a pleasant background note, while a generous amount of black pepper growls at the back of your throat as you crunch.

As easy as these picos were to make, I can’t see not making these for any sort of cocktail party, though I might refrain from serving the showy things at a wine tasting, where they would certainly steal the limelight from the real star of such an event.  Instead, set out a plateful next to some meaty Manzanilla olives, or buttery Marcona almonds, and watch as they vanish before your eyes.  With appetizers like this, who needs entrées?

picos-2


Picos
Makes 24 to 30

1½ tablespoons sesame seeds, toasted
9 ounces (2 cups) unbleached all-purpose flour
1/2 teaspoon instant yeast
1/2 teaspoon salt
1/2 teaspoon freshly ground black pepper
1/2 cup water, at room temperature
1/4 cup olive oil

1.  In a mortar and pestle or spice grinder, crush or grind the sesame seeds until broken up, but not made into a paste.  Add to the flour, along with the yeast, salt, and pepper, and whisk until combined.

2.  Add the water and olive oil, and stir until a rough dough forms.  Turn out onto a work surface, and knead until smooth, about 3 to 5 minutes.  Dust with flour as needed to prevent sticking.  Transfer to a lightly-oiled bowl, cover tightly with plastic wrap, and let sit at room temperature for about 1 hour, or until nearly doubled in size.  Alternatively, you can refrigerate the dough at this point for up to 24 hours.  Let come to room temperature for about 1 hour before proceeding.

3.  Line a large baking sheet with parchment paper.  Turn the dough out onto an un-floured work surface, and knead a few times to deflate.  Divide the dough into two even halves, and roll each out into a thick rope.  Cut each rope into 12 to 15 pieces.  Keeping unused pieces covered, roll each piece between your hands into a round ball.  Cover loosely with plastic wrap, and let rest on the counter for 10 minutes.  Preheat the oven to 375º F.

4.  After resting, roll each ball out between your palm and the counter, into a short, fat log with tapered ends, each about 3 inches long.  Transfer to the prepared baking sheet, cover loosely with plastic wrap, and repeat with the remaining dough.  Let sit at room temperature for 45 to 60 minutes, or until puffy and nearly doubled in size.

5.  Bake at 375º F for 25 minutes, or until golden brown.  For picos with a slightly tender interior, remove from the oven immediately, and transfer to a cooling rack.  For a totally crisp breadstick, turn the oven off and leave the picos in it for about 1 hour longer.  Serve warm or at room temperature.


Notes:
1.  Picos may be kept at room temperature in an airtight container for about 1 week.  They may also be wrapped tightly and frozen, reheating in a 350º F oven for about 5 minutes.

2.  This recipe makes fairly large picos, but feel free to make smaller ones if you prefer.  You may find smaller ones easier to eat, especially if you make them very dry and crunchy.  I estimate this recipe could make about 50 to 60 small picos, about 1½ inches long.

3.  If you prefer a whole grain version, I don’t see any problems with substituting whole wheat flour for all of the bread flour.  If you want the best of both worlds, try using white whole wheat flour instead.

Posted in Savory, Yeast Breads | Leave a comment

Tortas de Aceite

Week Thirty-Eight: Spanish Breads

torta-de-aceite-2

Thank you, first of all, dear readers, for bearing with me as I’m still running a day behind on my posts.  I’m working furiously trying to get everything done, and it never seems there’s enough time to do it all!

The focus for this week is on Spanish breads, a land of well over 300 distinct types, according to a 1999 study.  The Spanish eat a truly staggering amount of bread, going through a loaf a day for a small household – or even for one person.  There’s a little turn of phrase that adequately and laconically sums up the national attitude towards bread: If there isn’t bread, it isn’t a meal.

So why in God’s Green Earth is it so difficult to find recipes for specifically Spanish breads?  I didn’t have such problems finding African or East Asian breads, places where they hardly grow any wheat at all.  I did manage to track down one website full of Spanish bread recipes, but it was all scaled for professional bakeries, calling for things like 5.000 grams of flour, and my high school Spanish classes did not sufficiently prepare me to translate elaborate recipes over a decade later.

Adding to the difficulty, many Spanish breads are quite similar in name and in makeup to other more familiar breads from nearby countries.  Spain’s chapata, for example, is a dead ringer for Italy’s ciabatta; and what is a barra if not a slightly harder baguette?  There’s not much point in my posting a recipe that differs only in nomenclature from a previous post.

Despite my travails, I persevered, and have managed to unearth six recipes that could hardly be more Spanish.  Today’s bread, torta de aceite [TOR-tah day ah-SAY-tay], has gained a considerable following of devoted fans, with a notable recent mention in Gourmet Magazine.  The word “torta” in the name doesn’t mean “cake” (which is “tarta” in Spain), but rather refers to any round, flat food, usually bready in nature.  So the name roughly translates to “olive oil flatbread”, but that hardly begins to describe it.

Tortas de aceite are a light and crisp, though relatively thick cracker, about the size of a small plate.  As the name implies, they are redolent with fruity olive oil, one of Spain’s culinary crown jewels.  Flavored intriguingly with anise and lightly sweetened, this Andalucian specialty certainly takes cues from the sweet-savory cuisine of nearby Morocco, just across the Strait of Gibraltar.

The liberal amount of olive oil in this dough not only lends a fresh and seductive greenness, but also makes the finished cracker flake a bit, rather than crumble.  They can be topped with a sprinkling of sugar, with crushed almonds, or simply left plain, for a more savory variety.  Here, I’ve left them plain, to really let the savory side shine.  And if, like a few people I know, you’re not fond of a licorice anise flavor, don’t worry one bit about it.  It’s present, but not in the usual brash manner; it’s very subdued, and gorgeously balanced.

I managed, as I usually do with flatbreads, to roll these too thinly.  My crackers therefore puffed up hugely like pita bread, but never deflated again, balloons that punctured seemingly with even a sideways glance.  They were crisp but yielding, sweet yet savory, and wholly irresistible.  Rolled thicker, they must have been unbelievably good, especially served with cheese, tapenade, or fresh fruit, as suggested by several retailers of the snack.

Because I’m a perfectionist, and because these were so incredibly tasty, I want to have another go at these.  This recipe makes 6 tortas de aceite, a pitiably small yield.  I’ve seen that versions of these are grilled or broiled instead of (or in conjunction with) baking; the promise of a little smoky char to caramelize the sweet anise flavor is almost too much to resist.  Be on the lookout for another attempt, and thank you again for your patience with me!

torta-de-aceite-1


Tortas de Aceite
Adapted from Tildology
Makes 6 tortas

1/4 cup virgin or extra-virgin olive oil
Peel of 1/2 lemon, cut in long strips
1 whole star anise
8 ounces (1 3/4 cups) unbleached all-purpose flour
1/2 teaspoon instant yeast
1 teaspoon sugar
1 three-fingered pinch of salt
1/3 cup water, at room temperature
3/4 ounce (1½ tablespoons) anise liqueur (such as anisette, Pernod, Herbsaint, or similar)

1.  In a small saucepan, heat the olive oil with the lemon peel and star anise over medium heat for 3 to 5 minutes, or until warm.  Remove from heat, and let steep until cool.

2.  Whisk together the flour, yeast, sugar, and salt in a medium bowl.  Add the water and liqueur.  Strain the olive oil into the mixture, discarding the lemon peel and star anise.  Mix together until a rough dough forms, then knead on a work surface until smooth, about 3 minutes, dusting with flour as needed to prevent sticking.

3.  Return to the bowl, cover tightly with plastic wrap, and let rise at room temperature until doubled, about 1 to 1½ hours.  Thirty minutes before baking, preheat the oven to 325º F.

4.  Turn the dough out onto a work surface, and knead a few times until deflated and smooth.  Divide into 6 even pieces.  Keeping the unused pieces covered, roll each into a round ball.  Cover and let rest 5 minutes.  Lightly grease a large baking sheet, or line with parchment paper.

5.  On a lightly-dusted surface, roll each ball out into a round disc, about 5 to 6 inches across, or about 1/4 inch thick.  Transfer to the prepared baking sheet.

6.  Bake the tortas at 325º F for 10 to 15 minutes, or until golden brown.  Transfer to a wire rack to cool.  Serve warm, at once, or at room temperature.


Notes:
1.  If you prefer a sweeter version, you can sprinkle the rolled-out rounds with a bit of sugar (of any sort) before baking.

Posted in Savory, Sweet, Yeast Breads | 2 Comments

Danish Pastry Dough

Week Thirty-Seven: Viennoiserie

danish-1

In the morning, before the thundering traffic tide rolls in, a million underpaid hotel workers set up the Continental breakfast buffet.  Complimentary, of course.  All the regulars are there: purple-hued blueberry muffins, tops slicked over like some 50’s greaser sterotype; pre-split and pre-dried-out bagels next to a cheap toaster, keeping a protective eye over their individually-wrapped cream cheese babies; if you’re lucky, there’s scrambled eggs being slowly cooked to death over a hotel pan full of steaming water; and then the Danish, glistening like jewels under apricot glaze, beckoning with fillings of ivory cream cheese or the incarnadine gloss of an unspecified fruit, draped with white veils of icing.

Lured by the scent of a million coffee pots, pressed by the demands of business conferences or flights to catch, hotel guests shuffle in.  Since they, like humans do, eat first with their eyes, is it any wonder the Danish disappear before anything else?  They might be as tasteless as dust, or as over-sweet as cotton candy, but oh my goodness!, don’t they look shiny!

Too often, the Danish we encounter are such forlorn-tasting creatures as these, giving a bad name to the authentic ones in the world.  However, it’s easy to understand why so many lesser Danish exist, as fussy as it is to do them properly.  There is first the dough, which must be carefully laminated with butter, a time-consuming multi-step process of folding and rolling.  Then, any fillings such as pastry cream, fruit fillings, cream cheese filling, etc. must be made.  And finally, the pastries themselves must be cut out precisely, filled, shaped, risen, baked, and glazed.

The reward for all this effort is a veritable mountain of flaky, sparkling Danish, slightly less light than a croissant, and far more indulgent.  The edges crisp in the oven, giving a crunch that contrasts to the more tender interior, and fall apart in a shower of broad, flat crumbs.  Depending on the shape of the pastry – which are innumerable – you can get more crunchy exterior, or more soft crumb, or more filling, depending on personal preference.  Fillings, depending on type, ooze out slowly as you bite, drip down like honey as you tilt, or shatter off in miniature explosions.

Danish dough is made in a similar fashion to a croissant, but the dough (pre-lamination) is far richer.  Fillings, which run the gamut from a simple cinnamon-sugar to nuts to pastry cream and fresh fruit, and everything in between, tend to be sweet and moist.  A drizzle of white icing ribboned over the top is quite pretty and common, but can often be an unnecessary further gilding of the lily.

I’ve decided to make two very basic Danishes today, with fillings that require no further work than stirring sugar into cinnamon.  Pastry cream is not very difficult, and is awfully delicious wrapped up in a toasty bit of Danish pastry; but after making this dough, you’ll be ready to sit down and not have too cook anymore.

The first, called a “snail” or “spiral”, is a classic pastry, and uses thin strips of dough layered with a sprinkling of cinnamon-sugar, twisted, then spiralled around itself.  Quick, attractive, and delicious, they’re an easy way to use up any rough edges you may have trimmed in order to make the second pastry: a pinwheel.  They look just like you think they would, and are surprisingly easy to make.  These, I’ve simply filled with an orange marmalade, but are most often done with pastry cream and fresh fruit.

Danish dough can be used for nearly any type of pastry: turnovers, bear claws, cinnamon rolls, sticky buns, figure-eights, braids, wreaths, anything your imagination can think up.  Fillings, of course, can be as simple as you like or as elaborate and eye-rolling as you like.

You may notice the dull lustre of my Danish.  This was because after rolling, folding, waiting, rolling, shaping, filling, baking, and photographing all those pastries, the thought of glazing the little darlings totally slipped my mind.  Glazing is what gives Danish their characteristic shine, and is a very easy step.  They taste very nearly the same, however, glazed or not; it’s up to you to decide if you’re up to the challenge.  I must warn you, though, that with a cooling rack full of Danish glimmering at you like the top of the Chrysler Building, you may not be able to resist their charms.  Don’t set a plate of them out unless you want them gone in minutes.  Take it from one who knows.

danish-2


Danish Pastry Dough
Adapted from Professional Baking, by Wayne Gisslen
Makes enough dough for about 24 snails and 15 pinwheels

For dough:
1 1/4 cups milk, at room temperature
1 large egg + 1 yolk
3 tablespoons butter, melted and cooled slightly
24 ounces (about 5 cups) unbleached bread flour
3 tablespoons sugar
4 teaspoons instant yeast
2 teaspoons salt
1 pound butter, slightly softened, for rolling in

For snail fillings:
Melted butter, for brushing
1/4 cup granulated sugar
1/2 teaspoon ground cinnamon

For pinwheel fillings:
1/2 cup orange marmalade

1 egg yolk, beaten with 1 tablespoon milk, to make an egg wash
Apricot or clear glaze, recipes below

1.  In the bowl of a stand mixer, whisk together the milk, egg, yolk, and melted butter.  Whisk together the flour, sugar, yeast, and salt, and add to the wet ingredients in the mixer.

2.  Using the dough hook at low speed, mix until all the flour is moistened, scraping the bowl as needed.  Knead for about 2 minutes at low speed, or until smooth.

3.  Transfer the dough to a large, lightly-oiled bowl.  Cover tightly with plastic wrap, and let rest at room temperature for 30 to 45 minutes, or until risen and puffy (not necessarily doubled in size).

4.  Punch the dough down in the bowl, deflating it.  Cover tightly with plastic wrap, and refrigerate for 45 minutes.  Thirty minutes before laminating with butter, remove the butter from the refrigerator.  It should be slightly soft, but not squishy.

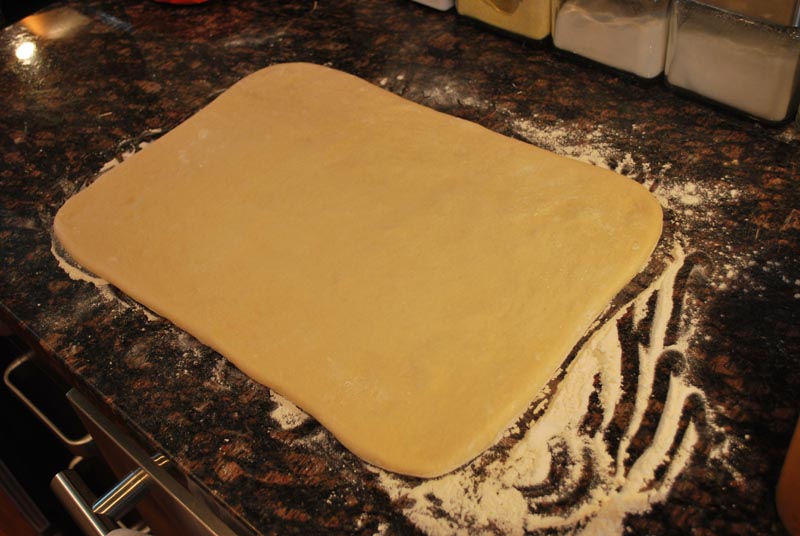
5.  Turn the dough out onto a lightly floured surface.  Roll the dough out to a large rectangle 1/2 inch thick, dusting with flour as necessary, and lifting and stretching (especially in corners) until it’s the proper size.  Turn (spin) the dough occasionally to make sure it isn’t sticking.  If the dough resists, cover with plastic wrap and let rest for 10 minutes, then try again.

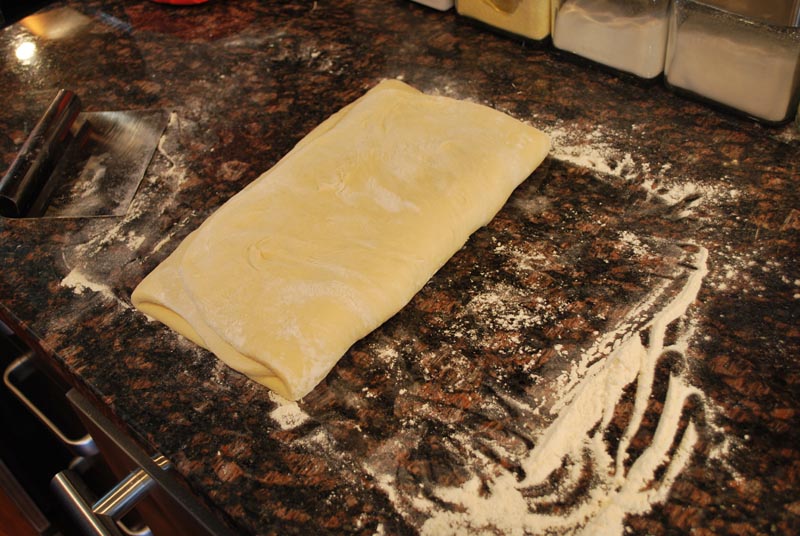
6.  Gently spread the softened butter over the right 2/3 of the dough, taking care not to tear the dough.  Fold the dough over the butter as you would fold a letter: the left, un-buttered third of dough over the butter, then the right, buttered third over the dough.  Brush any excess flour off with a pastry brush.

7.  Turn the dough so that a short side is nearest you, then flatten dough slightly by pressing down horizontally with rolling pin across dough at regular intervals.  Roll out the dough into a rectangle, rolling just to but not over the ends, trying to keep it as square as possible.

8.  Brush off any excess flour with a pastry brush.  Fold the dough in thirds like a letter, as before, lifting and stretching the corners to square off dough, forming a rectangle.  This is the first fold.  Chill the dough, wrapped in plastic wrap, for 30 minutes.

9.  Make 2 more folds in same manner as in steps 7 and 8, chilling the dough (wrapped) for 30 minutes after each fold, for a total of 3 folds (see note 1 below).  If any butter oozes out while rolling, sprinkle with flour to prevent sticking.  Wrap the dough loosely but totally in plastic wrap and chill for at least 1 hour but no more than 18 (after 18 hours, dough may not rise sufficiently when baked).

10.  Preheat the oven to 350º F.  Lightly grease two large baking sheets, or line with parchment paper or a silicone mat.  Cut the dough in half and chill one piece, wrapped in plastic wrap.  Roll out the other half on a lightly floured surface, dusting with flour as necessary and stretching the corners to maintain its shape, into a 16 x 12 inch rectangle.  Brush off any excess flour with a pastry brush.  Place the dough so that a long side is nearest you.

11.  For snails, mix the sugar and cinnamon together.  Brush the dough with melted butter.  Sprinkle the cinnamon-sugar over the half of the dough that is closest to you (dividing the dough in half lengthwise).  Fold the un-sugared half over the sugared half, and roll lightly to press the layers together.

12.  Using a pizza wheel, or a sharp knife (taking care to cut straight down, not dragging the knife, which will prevent the dough from rising properly along the edges), cut the dough vertically (lines perpendicular to you) into thin strips less than 1/2 inch wide.

13.  Twist each strip several times, stretching a little as you twist, then curl it around itself into a spiral.  Transfer to one prepared baking sheet, tucking the tail end underneath.  Repeat with remaining strips.  Cover loosely with plastic wrap, and let rise at room temperature for about 20 minutes, or until slightly risen and puffy.

14.  To make pinwheels, roll out the remaining dough on a lightly floured surface, dusting with flour as necessary and stretching the corners to maintain its shape, into a rectangle about 1/2 inch thick.  Brush off any excess flour with a pastry brush.  Place the dough so that a long side is nearest you.

15.  Using a pizza wheel, or a sharp knife (taking care to cut straight down, not dragging the knife, which will prevent the dough from rising properly along the edges), trim the edges of the dough so that it is reasonably squared and straight.  Cut the dough into even squares (I was able to get 15, but I rolled mine fairly thin).

16.  Working with one square at a time, make a cut from each corner towards the center of the square.  Do not join the cuts; it should now look like a Florian cross.   Brush the top lightly with egg wash (when finished, cover and chill the egg wash to use later).  Fold alternating corner flaps into the center to make the pinwheel shape, pressing firmly to seal.  Repeat with the remaining squares.  Cover loosely with plastic wrap, and let rise at room temperature for about 20 minutes, or until slightly risen and puffy.

17.  When pinwheels are risen, make an indentation in the center of each by pressing firmly with a floured fingertip.  Place about 1 teaspoon of orange marmalade in each indentation.  Lightly brush the pastry with egg wash, being careful not to deflate it.

18.  For snails and pinwheels both, bake at 350º F for 15 to 20 minutes, or until just golden brown.  Remove from the oven, and brush immediately with warm apricot glaze or warm clear glaze.  Let cool briefly on the pan, about 3 to 4 minutes, then remove to a wire rack to cool thoroughly.  Serve warm.


Apricot Glaze
Makes 1/2 cup

5 ounces (about 1/2 cup) apricot preserves or jelly
2 tablespoons water

1.  Bring preserves and water to a boil in a small saucepan.  Cook until reduced slightly and thickened.  Strain, and use while warm.


Clear Glaze
Makes about 1 cup

1/3 cup water
1/3 cup granulated sugar
1/3 cup plus 2 tablespoons light corn syrup

1.  Bring all ingredients to a boil in a small saucepan.  Heat until sugar is dissolved, then remove from heat.  Use while warm.


Notes:
1.  In step 9 of the dough recipe, I find that I easily lose track of the number of folds I’ve made.  To make it easy, write the number of folds you’ve made in permanent marker on the outside of the plastic wrap covering the dough.

2.  If the dough resists during any rolling-out step, rest the dough for 5 to 10 minutes, covered with plastic wrap.

3.  During any rolling-out step, try to roll the dough equally in both directions.  This will stretch the gluten more evenly, resulting in a dough that will be evenly malleable.

Posted in Sweet, Yeast Breads | 1 Comment