Dabo Kolo

Week Twenty-Nine: African Breads

dabo-kolo

Okay, y’all, African Bread Week pretty much rocks.  Not only have I been introduced to several new and interesting breads, but I’ve learned about not one, but two exciting spice blends!  The first was an Egyptian blend called dukka, which is incredibly earthy and deep, and quite seductive, but the second one has just blown me away!

It’s called berberé, and hails from Ethiopia.  Where dukka is dark and mysterious, berberé is bright and explosive.  It’s basically made by emptying your entire spice cabinet into a bowl – using an extremely heavy hand with the red peppers and paprika – but the result is like nothing else I’ve tried.  Oh yes, it’s spicy for sure, but there’s such an incredible depth of flavor behind all those Scoville units!  I don’t remember the last time I got so excited over a spice that I literally jumped around the kitchen, but that’s what berberé did to me.

I hope all my dinner guests for the next month or so like heat, because that’s what they’re likely to get.  I can see putting berberé on almost literally everything.  Is there anything that doesn’t benefit from a little complex spiciness?  Eggs, chicken, tofu, rice, stir fries, spinach, potatoes, pasta, pork, asparagus; you name it, I’ll probably do it.  And if I think you’re adventurous enough, I might slip some in your dessert, either in the chocolate mousse or in a plate of brownies.  I’m not even joking.  Chocolate and chile pepper is delicious.

But back to the point: the recipe I’m using this berberé in today is a very popular Ethiopian snack food, called dabo kolo.  The word “dabo” means “bread”, while “kolo” is the word for roasted barley, which is also eaten as a snack.  So basically, the name means “snack bread”, or something like that.  And if you’re prone to snacking, you may want to lock these away, because they are addictive.  Seriously addictive.

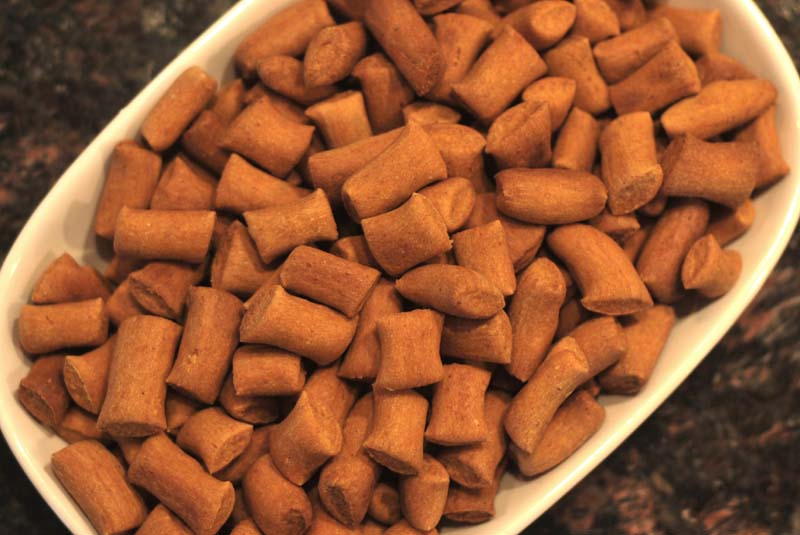
Dabo kolo are crunchy little guys, almost like a cracker, but thicker and more bite-sized.  (Actually, you could probably fit a handful in your mouth at once, but it might be hard to chew.)  You can make them with white or whole wheat flour, and with oil or butter, depending on preference.  I made them with butter and with white whole wheat flour, to get the best of both floury worlds.  They end up looking a little like filled pretzels, or even those dreadful Combos snacks, but they taste nothing like them – they’re worlds better!

And the berberé!  It might seem like an awful lot of spice to add, but don’t be shy.  It’s just right – not hot enough to sear your taste receptors into oblivion, but hot enough that it’ll build up in the back of your throat after a handful or two.  It’s so, so good!  Such a fantastically complex flavor!

And, best of all, dabo kolo couldn’t be easier to make, and would be a great activity if you have little kids running around (though you may want to reduce the heat level in that case).  I made about 300 pieces from this batch, which seems like more than you’d ever need; but they’re so small and so addictive, I find myself wishing I’d doubled the recipe.  Three hundred isn’t as many as you’d think.

These are an ideal cocktail party food: small, starchy, spicy, and utterly habit-forming.  They keep for ages at room temperature, so if you entertain frequently, these are the perfect make-ahead hors d’oeuvre.  But even if your social calendar has cobwebs on it, there’s nothing stopping you from keeping a stash of these in your pantry.  You know, just in case.

dabo-kolo-2


Dabo Kolo
Makes about 300 pieces

2 cups white whole wheat flour
2 tablespoons berberé (recipe follows)
1 tablespoon sugar
1 teaspoon kosher salt
1/2 cup water, room temperature
4 tablespoons unsalted butter, melted, or vegetable oil

1.  Preheat oven to 350° F.  Lightly grease two large baking sheets, or line with parchment paper.

2.  In a bowl, whisk together the flour, berberé, sugar, and salt.  Add the water and butter or oil and mix to form a thick, stiff dough.

3.  Turn the mixture out onto an unfloured work surface.  Knead lightly for 1 to 2 minutes, or until smooth.  If necessary, sprinkle a little additional flour over the surface to prevent sticking.  Cover well with plastic wrap, and let the dough rest in place for at least ten minutes.  Dough can be wrapped tightly and refrigerated, for up to 24 hours at this point.  Let come to room temperature for 30 minutes before proceeding.

4.  Divide the dough 4 to 8 pieces.  Roll each piece under your hands into a long rope, about as thick as a pencil.  If the dough resists, or starts retracting after rolling, set aside for a few minutes to let it relax.  Cut each rope into tiny pieces, using a bench scraper, scissors, or a knife.  Each piece should be about as long as the width of a finger.

5.  Arrange in a single layer on the prepared baking sheets.  Bake at 350° F for 20 to 25 minutes, or until crunchy and browned.  If not using parchment paper, shake the pan or stir a few times to prevent sticking.

6.  When fully baked, remove from oven and allow to cool completely on the pans.  Store at room temperature in an air-tight container.


Berberé
Makes about 1/2 cup

1/4 cup dried chiles
1 teaspoon red pepper flakes
3/4 teaspoon whole fenugreek
6 pods cardamom (1/2 teaspoon ground)
1/2 teaspoon whole coriander
1/2 teaspoon whole cumin
1/2 teaspoon whole black peppercorns
3 tablespoons paprika
1 teaspoon salt
1 teaspoon ground ginger
1/2 teaspoon garlic powder
1/8 teaspoon ground cloves
1/8 teaspoon ground cinnamon
1/8 teaspoon ground allspice

1.  In a spice (or coffee) grinder, combine the dried chiles, red pepper flakes, fenugreek, cardamom, coriander, cumin, and peppercorns.  Grind until finely ground.  Transfer to a bowl.

2.  Add remaining spices to mixture in bowl, and whisk to combine.  Keep in an airtight container.


Notes:
1.  I used white whole wheat flour, but you can use whatever kind of flour you like, regular whole wheat, all-purpose, or even a mixture.

2.  If you can’t be bothered to make berberé, or if you’re in a time crunch, you can substitute cayenne pepper instead.  Just don’t serve that to any of your Ethiopian friends if you do!

3.  Dabo kolo can also be made on the stovetop: heat a large skillet over medium heat.  Place enough of the uncooked dabo kolo in the pan to cover the bottom.  Cook, shaking the pan or stirring occasionally, until lightly browned on all sides.  They will need to be cooked in batches.

4.  For the berberé, I listed the whole and ground spices as I used them, which was based on what existed in my spice cabinet.  I highly recommend grinding all spices yourself as often as possible, since the flavors dissipate very quickly once ground.  If you have any or all of the ground spices as whole spices, please use them; but if you have pre-ground spices, those are fine also.  (Did that make sense?)

Posted in Savory, Unleavened Breads | Leave a comment

Ksra (Moroccan Flatbread)

Week Twenty-Nine: African Breads

ksra

Moroccan cuisine is generally regarded as one of the most diverse on the planet.  Being a crossroads between the European, African, and Arabic worlds, Moroccan food draws inspiration from native North African Berber, Spanish, French, Turkish, Indian, Italian, Jewish, and Moorish cooking traditions – and from just about anyone else who’s even sneezed a grain of black pepper in their general direction.

It’s full of every spice imaginable, and the incredible fragrances that fill your home when you create a Moroccan dish will drive your neighbors wild.  Think dried fruit, preserved lemon, honey, olive oil, mint, lamb, and couscous, and you’ve still just barely scratched the surface.

In Morocco, meals are always accompanied by bread, as bread is generally used in lieu of utensils.  Breads are usually flat, and can be anywhere from a few inches to a few feet across.  Like other areas surrounding the Mediterranean, two kinds of wheat make up the majority of starch in the diet: either common (a.k.a. bread) wheat or durum (a.k.a. semolina) wheat.  Semolina, of course, is best known for its use in making pasta, or more commonly in Morocco, couscous.

But though common wheat is (ahem) common in Morocco, breads are often made with a combination of different types of flours; barley and semolina flours are often added to common wheat flour.  The bread for today, ksra, is typically made with all three, and is flavored with aniseed and sesame seeds.  You’d typically see this bread paired with any and every main dish imaginable, but it’s quite useful for soaking up any liquid left on the plate from your stew-like (and ubiquitous) tajine.

Unfortunately, despite the fact that I have approximately ten thousand types of flour in my cabinet right now, I had no barley flour when I went to make this bread.  Nor did I have aniseed; so a few substitutions were in order.  I did, however, have semolina flour, so that was a start, and the anise-flavor of the fennel seeds in my spice rack would make a fair stand-in.

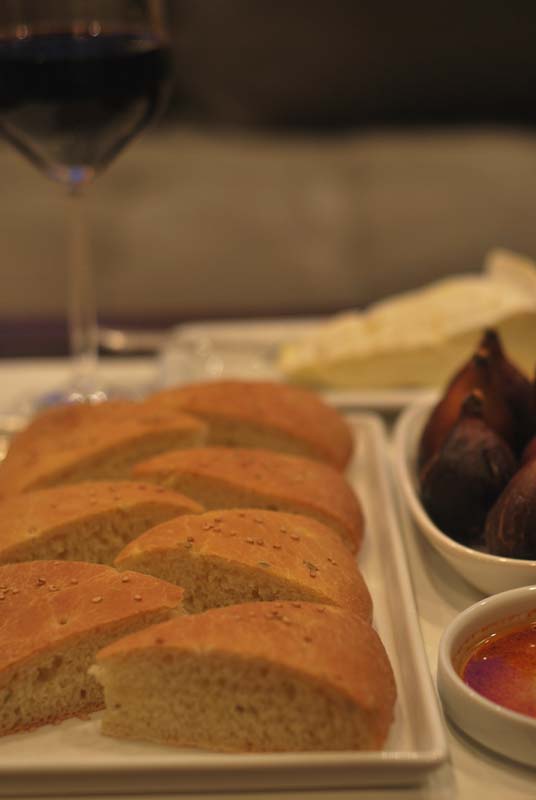
The end result was really fabulous, a soft and slightly sweet bread, about as thick as a standard focaccia, that impeccably stood up to a rather non-authentically-Moroccan spread of soft brie, spiced oil, and fresh figs.  The crust had a slight crispness just out of the oven, but softened a bit after standing, retaining a pleasant chew.  The interior had a cheerful softness, and the sporadic notes of licorice from the pale green fennel seeds provided a soft, herbal backdrop.  Paired with a glass of wine, it was a thoroughly enjoyable repast.

This bread was really quite easy to make, with its relatively short rising time, and would absolutely enhance any cheese platter or charcuterie plate.  Of course, if you happen to have some couscous in the pantry, it would be the ideal accompaniment to your favorite tajine recipe – or a perfect time to find a favorite!  (Oh, and don’t forget the mint tea for a truly authentic experience.  You can’t throw a rock in Morocco without hitting a cup of mint tea.)


Ksra (Moroccan Flatbread)
Adapted from Bread, by Christine Ingram and Jennie Shapter
Makes 2 loaves

9 ounces unbleached bread flour
3 ounces (1/2 cup) semolina
1 teaspoon fennel seeds, crushed
1 1/2 teaspoons kosher salt
1 teaspoon instant yeast
7 ounces (1 cup minus 2 tablespoons) water, at room temperature
2 teaspoons light honey
2 tablespoons olive oil, plus extra for brushing
Sesame seeds, for finishing

1.  In the bowl of a stand mixer, whisk together the flour, semolina, fennel, salt, and yeast.  Add the water, honey, and 2 tablespoons olive oil, and mix with the dough hook at low speed until a rough dough forms.  Scrape the bowl if needed, and increase the speed to medium-low and knead for 6 to 8 minutes, or until the dough forms a cohesive ball that clears the sides of the bowl, and becomes elastic.

2.  Turn the dough out onto a lightly floured surface, and knead a few times, forming the dough into a round ball with a skin stretching over the outside.  Transfer to a lightly oiled bowl, smooth side up.  Cover and let rise in a warm place until doubled in size, about 1 hour.

3.  Line a large baking sheet with parchment paper.  Gently deflate the dough, and turn out onto a lightly floured surface.  Divide the dough into two equal halves, and shape each into a round ball.  Flatten each piece slightly, cover loosely with plastic wrap, and let rest for 15 to 20 minutes.

4.  Working with one piece at a time, and keeping the other covered, roll each out to a flat round about 1/4 to 1/2 inch thick, using a rolling pin.  Transfer the dough to the prepared baking sheet, and cover loosely with plastic wrap.  Let rise until doubled in size, about 30 minutes.  Preheat the oven to 400º F.

5.  Gently brush the risen loaves with olive oil, being careful not to deflate them.  Sprinkle sesame seeds evenly over the top, and using a skewer or fork, prick the tops several times.

6.  Bake at 400º F for 20 to 25 minutes, or until golden brown and baked through.  Remove the bread to a wire rack to cool briefly before slicing, about 10 to 15 minutes. 


Notes:
1.  You can certainly make this bread any size or thickness you like, but ksra is traditionally about plate-sized, and slightly thinner than focaccia, but thicker than naan.

Posted in Savory, Yeast Breads | Leave a comment

Diphaphata

Week Twenty-Nine: African Breads

diphaphata

The bread for today hails from Botswana, a country of cuisine unique in the Southern end of Africa.  Covered mostly by the Kalahari Desert, wheat doesn’t exactly grow well there; but bread made with imported wheat has found its way onto the Botswanan table, alongside the traditional seswaa (pounded meat) and variously-prepared mopane worms (oh, yes).

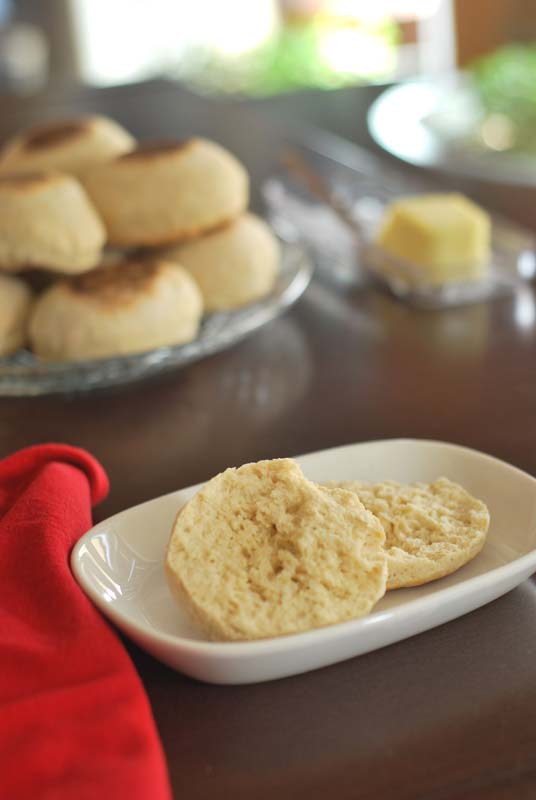
It’s a strange name, but don’t let it fool you – these are more familiar than you might think.  Diphaphata (dee-pah-pah-tah) are actually prepared in a very similar fashion to English muffins, though they are not entirely alike.  Both are cooked on a flat griddle or pan, but diphaphata lack the characteristic tang of an English muffin, as well as the trademark “nooks and crannies” found in a split English muffin.

They end up with a similarly soft crust, and tender interior, but diphaphata are denser inside, and more bready.  Additionally, they are much, much faster to make.  This may or may not be a benefit to you, weighing the improved flavor of a long rise, versus the time saved.  (If you make these in the morning, that might just be a no-brainer, especially if no one’s made coffee yet.)

I’ve not been able to find any images of what diphaphata are supposed to look like, but it seems to me that the typical translation of the word – “flat cakes” – is quite the misnomer.  I didn’t exactly roll these out to wafer-thinness, but they puffed up so much they were nearly round!  They were very pretty, especially when all stacked up on a plate, but I certainly wouldn’t call them “flat”.  Make of that what you will.

Every bit of information I’ve seen on these breads (it wasn’t much) indicates that they’re meant to be eaten with meat, or some sort of main dish.  Perhaps it’s a cultural bias in me, equating these with English muffins after all, but these somehow seem like a breakfast food.  The texture would certainly not be out of place on a dinner table, and would probably be a lovely addition.  But these were quite fast to make, and tasted so good toasted with just butter and honey, that I would serve them for brunch in a heartbeat.

These breads are a bit dense, but somehow still fluffy, from the use of baking powder.  This airiness also gives them a slight “nook and cranny” texture when pulled apart or split with a fork (rather than cutting with a knife), just perfect for going crunchy under a broiler, and for catching rivulets of melting butter.  They have a mild but pleasant flavor that would definitely not overpower any food you choose to serve them with.  The soft texture would do a lovely job soaking up any leftover “plate juices” from a stew-type meal, which are typical in Botswanan cooking.  However you choose to serve them, these breads are sure to be a welcome addition to your table, morning or night.


Diphaphata (Flat Cakes)
Adapted from Extending The Table, by Joetta Handrich Schlabach
Makes about 15

12 ounces (about 2 2/3 cups) unbleached all-purpose flour
5 ounces (about 1 cup) white whole wheat flour
4 teaspoons baking powder
1/2 teaspoon kosher salt
1 tablespoon sugar
3/4 cup milk, at room temperature
1/2 cup water, at room temperature

1.  In a large bowl, whisk the flours, baking powder, salt, and sugar together.  Add the milk and water, and stir until a rough dough forms.  Turn the dough out onto a work surface, and knead until smooth, about 1 to 2 minutes.  Flatten as much as possible, and cover loosely with plastic wrap.  Let rest for 10 minutes.

2.  Using a rolling pin, roll the dough out to 1/4 inch thick, adding only as much flour as needed to prevent the dough from sticking.  With a round cutter, cut as many rounds as possible, and set aside.  Gather the scraps together.  Knead briefly to combine the scraps, flatten slightly, and cover loosely with plastic wrap.  Let rest while cooking the first batch.

3.  Heat a heavy nonstick pan over medium heat until hot.  Add as many pieces of dough will fit in the pan without touching, and immediately turn the heat down to low or medium-low.  Cook until browned and puffed, about 7 to 10 minutes.  Flip over, and continue cooking for another 6 to 8 minutes, or until browned.  Remove to a wire rack to cool.  Repeat with remaining dough.


Notes:
1.  If you can’t find white whole wheat flour, just substitute an equal amount of regular whole wheat flour, or additional all-purpose flour.  I liked the slightly rustic characteristic of the white whole wheat flour, which has the added benefit of acting more like regular all-purpose flour in baking.

Posted in Quick Breads, Savory | 1 Comment

Egyptian Spiced Flatbread

Week Twenty-Nine: African Breads

dukka

Previously in this project, I’ve featured breads of France,  Italy, America, and Scandinavia.  This week, I thought I’d take a plunge and look at the land that originated yeast bread as we know it (and, you know, humanity itself): Africa.  (And yes, I’m fully aware that Africa is a huge continent, full of myriad cultures, and that I’m grossly generalizing things when I say “African Bread”.  But I’m just baking bread here, not writing my dissertation.  I figure I’m allowed some leeway.)

First, a confession: I don’t really know much about African breads.  Or anything, really.  Part of this ignorance comes from being your standard, off-the-rack American, but part of it comes from the fact that Africa isn’t really known for their bread.  The climate generally not being suitable for growing wheat (except for regions of North Africa), few nations or groups in Africa have quite the same relationship with bread that, say, the French do.

But climate notwithstanding, some very lovely breads have nevertheless come from Africa, made either with non-wheat grains, or with imported wheat flour, first actually brought over by the Carthaginians.  This week, I hope not only going to learn about African breads, but to teach you about them too!

I have long known that the Ancient Egyptians were the first humans to bake yeasted bread as we know it on a large, almost industrial scale (in the 12th Century BC!), though leavened bread likely dates to prehistoric times.  But fascinatingly, I have only recently learned that another grain- and yeast-based staff of life – beer – was created at about the same time.  In fact, beer and bread were very nearly the same thing for the Ancient Egyptians: an early type of beer was made by crumbling a half-baked loaf of bread (not cooked enough to kill the yeast) into a vat of water, and letting the mixture ferment.

Beer and bread were so vital to survival for the Ancient Egyptians that wages were even often paid in the form of beer and bread (or in the grains used to make both, emmer wheat or barley).  One of the oldest hieroglyphs was what’s called a “bread cone“, which translates to mean “to give”.  Very telling of the culture, that!

Giving a nod to this history, I’m kicking things off this week with a yeasted flatbread (as might have been typical), flavored with an Egyptian spice mixture called dukka.  Also known as duqqa or dukkah, this mixture can vary wildly, depending on who’s making it.  Generally speaking, though, it is a mixture of nuts (usually hazelnuts or chickpeas), pepper, cumin, coriander, and sesame seeds, though it can include a dizzying array of additional seasonings.  It can be loose and crumbly, or it can be a thick paste, depending on preference and intended usage.

But all I know is that man! does it make your house smell good!  So fragrant!  So earthy!  And really, it doesn’t matter what you put in it – I’ve seen recipes using coconut, cinnamon, coffee, pumpkin seeds, thyme, five-spice, curry, and every nut from here to next week – just use whatever you love or have on hand.  It’s similar in many ways to a blend called za’atar, which you may be familiar with, except that za’atar generally uses thyme as its main ingredient (za’atar is the Arabic word for a certain type of thyme).

The recipe below for the dukka makes more than you’ll need for flavoring the bread, but you’ll surely want to have extra around after you smell it.  Like any spice blend, it’s got a million and one uses, but a very traditional use is to set a plate out next to a dish of olive oil, for dipping a piece of bread into (oil first, then dukka).  It can be used as a rub or crust for meats, for sprinkling over eggs, for flavoring rice, or simply garnishing soups or salads or anything else.  One extremely enticing suggestion I saw was to use it in an Arabian-style guacamole.  This, of course, means I’m having Arabian guacamole for dinner tomorrow.

The bread here is a fairly standard flatbread; the dough is lightly flavored with honey and olive oil, but otherwise simple enough.  It does, however, have a long, slow rise, which contributes greatly to the excellent flavor it has.  If you have time, it’s even better if you let it rise overnight in the fridge, though it’s not necessary.

Yes, this bread is good enough on its own; but spiced up with dukka, it’s amazing.  It’s just really, really good.  Crisp and chewy, complex and intensely flavorful, it doesn’t get a whole lot better than this.  If you happen to have any leftovers, I highly recommend cutting the bread into wedges, toasting them, and serving with hummus.  Yes, please.

Egyptian Spiced Flatbread
Adapted from Gourmet Magazine
Makes 8 six-inch flatbreads

For dukka:
1/4 cup hazelnuts, toasted
1/4 cup pistachios, toasted
1/4 cup almonds, toasted
1/4 cup peanuts, toasted
5 teaspoons coriander seeds
4 teaspoons sesame seeds
1 tablespoon cumin seeds
2 teaspoons nigella seeds (see note 2 below)
1 teaspoon whole black peppercorns
1/2 teaspoon fennel seeds
1 tablespoon paprika (hot or sweet)
1/2 teaspoon ground cinnamon

For bread:
2 cups unbleached all-purpose flour, plus extra
A scant 1/2 teaspoon instant yeast
1/2 teaspoon salt
3/4 cup very warm water (115 – 125° F)
1 tablespoon honey
1 tablespoon olive oil, plus extra for brushing
Kosher salt, for finishing

1.  To make dukka: toast nuts together in a 350° F oven for 7 to 10 minutes, stirring occasionally, until just golden and fragrant.  Let cool to room temperature.  Meanwhile, toast remaining spices (except for paprika, cinnamon, and salt) in a large pan over medium heat for 5 to 8 minutes, or until fragrant and toasted.  In a food processor or an electric coffee or spice grinder, pulse all ingredients until very finely ground, about 3 minutes.  Leave a little powdery; do not grind to a paste.  Set aside.

2.  In the bowl of a stand mixer, whisk together the flour, yeast, and salt.  Add the warm water, honey, and olive oil.  Using the dough hook, mix at low speed until a rough dough forms.  Increase the speed to medium and continue kneading until the dough clears the sides of the bowl and forms a cohesive ball, about 5 minutes.  If necessary, add 2 to 3 teaspoons more flour, 1 teaspoon at a time, until the dough achieves the proper consistency.

3.  Transfer the dough to a large, lightly oiled bowl.  Cover with plastic wrap, and let rise in a warm place until doubled in size, about 2 hours.

4.  Place the oven racks in the upper and lower thirds of the oven, and preheat to 425° F.  Line two large baking sheets with parchment paper.  Punch down the dough and transfer to a lightly floured surface.  Divide the dough into 8 equal pieces and let stand, covered with plastic wrap, for 15 minutes.

5.  Using a rolling pin, roll out each piece of dough (keep remaining pieces covered) on a lightly floured surface into a very thin round, about 6 inches across.  Transfer each round to one of the prepared baking sheets, and cover with plastic wrap.  Repair any tears in the dough by pinching it together.  Repeat with the remaining pieces of dough.  Brush each round with olive oil, and sprinkle each round liberally with dukka.  Dust kosher salt lightly over the tops.

6.   Bake the rounds at 425° F for 5 minutes.  Switch the position of the pans and rotate them 180 degrees, then continue baking for 5 additional minutes, or until golden brown.  Cool the bread on the pans for 5 minutes, then transfer flatbreads to a rack.  Serve warm.

Notes:
1.  Because dukka contains nuts, which go rancid fairly rapidly, you should store dukka in the refrigerator for up to 2 months, or in the freezer for about 6 months to a year.

2.  Nigella seeds, also known as black cumin, can be found in Middle Eastern or Indian markets, and have a wonderful complex, earthy, and spicy flavor.  If you can’t find them, you can simply omit them.

3.  I used toasted nuts here, because I wanted the depth of flavor; but raw is just as good.  In fact, if you use dukka for dishes that benefit from long, slow cooking, you may prefer to use raw nuts to avoid any burnt flavors that may result from the nuts being overdone.

Posted in Savory, Yeast Breads | Leave a comment

Pistachio, Fennel, and Golden Raisin Scones

Week Twenty-Eight: Breads With Nuts

pistachio-scones

The last bread for this week is a quick bread, true; and I did say that I was trying to avoid those.  But this recipe is so good, I couldn’t pass it up.  The title won me over, in one of those instances when you just know those ingredients can’t go wrong.  The original actually called for walnuts, but the idea of using pistachio instead seemed a bit more interesting, and somehow a bit more apropos.  And if you’ll pardon a little bragging, I was so right.  These scones are sophisticated and refined, and have such a fabulous combination of flavors!  They’re going in the permanent file for sure!

These scones end up rather biscuity in texture, but it’s not inappropriate to call these particular items “scones”.  There’s an awful lot of pieces of things in the dough (i.e. the pistachios and raisins), which pushes it over into “scone” territory, if you ask me.  I don’t know why I feel this way, and it may be purely a personal judgement, but I say biscuits don’t usually contain things.  Maybe herbs or cheese, but never chunks of things.  Scones, however, often do – currants, for one example – so no matter the texture, I say if it has bits in it, it’s a scone.  Besides, it’s rather splitting hairs to say that there’s any major difference between scone and biscuit textures.

But whatever you choose to call them, there’s no denying that these end up flaky, tender, and fragrant with fennel.  The green taste of pistachio with the anise flavor of fennel are a delightful half-sweet, half-savory foil for the cheery golden raisins, themselves plump little pockets of sweetness in each bite.

One lovely surprise of these scones is how savory they end up, despite a fair amount of sugar in the dough, and the use of raisins and fennel, both decidedly sweet items.  They taste just savory enough to be able to pair with dinner (something along the lines of roast chicken or pork), but they’re still scone enough to look comfortable on the table at brunch.

Of course, a scone is best when it’s soft and tender, and the tenderness of a scone (or biscuit) is all in the handling.  Overdo it when working the butter into the flour, and there’s nothing in the world that will keep your scones from ending up tough.  But don’t be scared!  Once you get the hang of it, it’s quite easy.  Oh, and having a trick up your sleeve doesn’t hurt either.

I never made tender biscuits, scones, pie crust, or anything similar until I started using this method: cut the butter into as small pieces as you can.  Tiny.  Miniscule, if you can manage it.  Put it on a plate and freeze the whole thing while you prepare the other ingredients.  By the time you’re ready to cut the butter in, it’s the perfect consistency: slightly pliable, but it isn’t going to melt in your hands.  Pinch the larger pieces into the appropriate size with only your fingertips, working as quickly as possible.  Don’t let your hands melt the butter.  If you have a pastry blender, that works quite well too; personally, I prefer to feel what’s going on in the flour, but that’s just me.

There was a chef-instructor, when I was in culinary school, who swore by simply grating a stick of frozen butter into the flour, then just tossing to combine.  Me, I could never quite get the hang of grating frozen butter without melting it.  If you can, though, it’s an otherwise-flawless method.  To each his own.

One last note: don’t be worried about the amount of fennel seed in this recipe.  It looked like a little much, and I thought it might overwhelm all the other flavors, but it mainly lent a sweet licorice scent to the scones, rather than a horribly obtrusive taste.  If you really, really don’t like licorice or anise, you may find it a bit much; but it was just right, to my palate.  It mellows a bit in cooking, and the seeds soften to the point that they were no harder to bite into than the bits of pistachio.  I thought they were simply fabulous – and so did everyone else at the table, based on how quickly they disappeared!


Pistachio, Fennel, and Golden Raisin Scones
Adapted from Bon Appétit Magazine
Makes 10 to 12 scones

2 cups unbleached all-purpose flour
1/3 cup brown sugar
2 teaspoons baking powder
1/2 teaspoon kosher salt
6 tablespoons very cold unsalted butter, cut into 1/4 inch pieces
1 large egg
1/2 cup cold buttermilk
1/2 cup golden raisins
1/3 cup pistachios, toasted and chopped
1 tablespoon whole fennel seeds

1.  Preheat oven to 400° F. Lightly grease a baking sheet, or line with parchment paper.

2.  In a large bowl, whisk together the flour, sugar, baking powder, and salt.  Add the butter.  Using your fingertips or a pastry blender, and working quickly, pinch and blend the mixture until coarse meal forms.  Lumps of butter are okay, but should be not much larger than a pea.

3.  Whisk egg and buttermilk together, and add to the flour mixture.  Gently stir until a rough dough forms.  Add the raisins, walnuts, and fennel seeds, and gently incorporate.  Turn the dough out onto a lightly floured work surface and knead very gently just until smooth, about 4 turns.

4.  Divide the dough in half.  With floured hands, pat each half into a round, about 1/2 inch thick.  Cut each round into 5 or 6 wedges.  Transfer each wedge to the prepared baking sheet.  Bake at 400° F until lightly browned, about 15 to 17 minutes.  Serve warm or at room temperature.


Notes:
1.  Make sure your butter is very cold, and be sure not to overwork it when cutting into the flour.  It won’t hurt a thing to have slightly large pieces of butter (it makes for a flakier result, in fact), but it will end up  tough if you fuss over it too long.  Just move quickly, and don’t overthink it!

Posted in Quick Breads, Savory | Leave a comment

Pine Nut Cardamom Bread

Week Twenty-Eight: Breads With Nuts

 pignoli

If you like cardamom – which I absolutely do – you should try this bread.  Pine nut and cardamom are one of those unusual and delightful pairings often seen in Middle Eastern and Southeastern European (i.e, Turkish) cooking.  The fragrant, unique flavor of cardamom, when combined with the buttery, nutty flavor of toasted pine nuts, takes on a spicy and vibrant tone that can become either savory or sweet, depending on any accompaniments.

Here, I’ve taken a trick from a gorgeous cake recipe that uses whole (shelled) cardamom seeds in the batter, creating bursts of cardamom flavor throughout the cake.  The seeds may seem like they would be hard if bitten into, but I figured if it’s okay in a cake, then it’s okay in a bread.  I did, however, crush them lightly to avoid any massive bits, and to spread the few seeds more evenly throughout the loaf.

In another nod to Middle Eastern cooking, I’ve also added a splash of orange flower water to add a little floral character and a citrus-y lightness to the mix.  If you don’t have any on hand, it’s fine to omit; but I just love the pairing of all three flavors.  On the technique side of things, I’ve used an autolyse period to get the maximum flavor out of the bread itself, to create the best possible backdrop for these unassuming yet gently insistant flavors.

The end result was a chewy, open-crumbed bread, with a cheerfully golden color, dotted through with toothsome bits of pine nut and tiny, dark specks of cardamom seeds that burst into little fireworks on your tongue.  The crust softened a bit after standing, due to the olive oil in the dough, but was still firm enough to provide substance.

This is a slightly exotic bread, a fusion of European-style bread with Middle Eastern flavor, ideal for pairing with whatever Persian dish you may choose to whip up.  Think savory rice with cinnamon and currants, lamb with yogurt sauce, charred kebabs of any kind of meat, the flavors of rose and pomegranate laced with saffron.  Whether simple or elaborate, you’re sure to please with this winner!


Pine Nut Cardamom Bread
Makes 1 loaf

14 ounces (about 3 cups) unbleached bread flour, divided
1 cup water, at room temperature
1 teaspoon kosher salt
1 teaspoon instant yeast
2 tablespoons olive oil
2 teaspoons orange flower water (optional)
1/4 cup pine nuts, toasted and chopped (see note 1 below)
6 whole cardamom pods

1.  In the bowl of a stand mixer, combine 12 ounces (about 2 1/2 cups) of the flour and all of the water.  Mix until all the flour is moistened.  Cover, and let stand at room temperature for 15 to 30 minutes.  While the dough rests, prepare pine nuts as directed (see note 1 below).  Set aside.  To prepare cardamom, gently crush the pods with the flat side of a chef’s knife, or with a mortar and pestle, only until they crack open.  Remove and separate the seeds, discarding the hulls.  You can crush the seeds lightly if you like.  Set aside.

2.  After the dough has rested, add the salt, yeast, oil, and orange flower water to the flour mixture in the bowl.  Using the dough hook, mix at low speed until all the ingredients are fully integrated, about 2 minutes.  You may need to add a handful of flour to help the ingredients incorporate.

3.  Increase the speed to medium-low, and continue kneading until the dough clears the sides and bottom of the bowl, about 8 to 10 minutes.  Add the remaining flour by spoonfuls as needed to achieve the proper consistency; the dough should be a bit slack, but should form a cohesive ball that clears the sides of the bowl.  Reduce the speed to low, and add the chopped pine nuts and cardamom seeds.  Continue mixing until evenly incorporated, about 2 to 3 minutes.

4.  Turn the dough out onto a lightly floured surface.  Knead a few times, until a skin forms around the outside of the dough.   Pull the skin taught around the dough, forming a round ball.  Transfer the dough to a lightly oiled bowl, turning to coat all sides with the oil.  Cover with plastic wrap and let sit at room temperature until doubled in size, about 1 hour.

5.  Lightly grease a baking sheet, or line with parchment paper.  Turn the dough out onto a lightly floured surface.  Gently deflate, and form the dough into a long loaf shape, tapering the ends.  Transfer to the prepared baking sheet, cover loosely with plastic wrap, and let rise until doubled in size, about 1 hour.  Thirty minutes before baking, preheat the oven to 400º F, along with a baking stone (if using).

6.  Uncover the bread, and using a sharp serrated knife, make one decisive slash quickly down the center of the bread, lengthwise.  Bake the loaves (on the baking sheet, or on a baking stone if using) at 400º F for 10 minutes, using your favorite steam technique (see note 2 below).  Continue baking for an additional 20 to 25 minutes, or until cooked through and browned.  An instant read thermometer should register about 200º F when inserted into the center.  Remove to a wire rack, and allow the bread to cool thoroughly before slicing.


Notes:
1.  To toast pine nuts, spread evenly in a sheet pan and bake at 325ºF until just golden brown and fragrant, about 5 to 10 minutes, stirring occasionally.  Cool to room temperature before using.

2.  Unless you have a steam-injecting oven (and I’m coming over immediately), you might want to try one of these methods for getting steam onto your bread, and have the crispiest crust imaginable.  I prefer simply spraying the loaf itself with a fine mist of water from a squirt bottle before baking, and every 2 minutes thereafter, until the recipe says to stop.  You can also place a rimmed baking dish or other oven-safe pan on the floor of the oven to preheat along with it, and toss ice cubes into the hot pan when you place the dough in the oven, and replenish as they melt away.  Remove the pan when the recipe indicates to stop the steam.  There are other methods, but I find these to be the most effective.

3.  You can use 1 teaspoon ground cardamom instead of the cardamom seeds if you like, but I highly recommend trying the seeds.

Posted in Savory, Yeast Breads | Leave a comment

Peanut Bread

Week Twenty-Eight: Breads With Nuts

peanut

This recipe is extra special, you guys!  Here’s why!  Were you aware that in 2005, Team USA won the Coupe du Monde?  I’m sure you know what that is, but for all the incogniscenti, it’s basically the World Cup of Pâtisserie, or in American terms, the Baking Olympics.  Our three man team not only defeated the reigning world champs, the Japanese team, but we beat the French, too!  That’s right, we out-baguetted the French! 

I know, right?!

This recipe was apparently one of their winning creations, and was designed to pay homage to Jimmy Carter, who was once a peanut farmer.  But whatever the inspiration, this bread is super-good!  I’ve tweaked things a bit, mostly in the shaping and instruction end of things, as the original instructions directed you to make a really beautiful but really, really hard to explain shape.  (It’s two fendus bent around to look like a peanut!)  I also fiddled with the recipe itself, because when I followed the given directions, my dough ended up more like batter than dough.

Now, I’m not one to be scared of a wet dough; many of the best breads I’ve made have seemed overly-wet.  They tend to firm up a bit when they rise, as the flour absorbs the water, and such.  Besides, more water in your dough means an airier bread, since water expands to 1,600 times its size when it turns to steam.  (And that’s how come we can power locomotives and turbines and such with just some hot water.  Neat!)  That steam pushes your dough up and away when it expands, and creates pretty holes in your bread before the structure cooks and sets firmly in place.  No, I’m not scared of wet dough, but this was ridiculous.  Even with the adjustments, it was still incredibly wet, to the point of being impossible to knead by hand.

So I’ve adjusted the hydration levels a bit (oh, and translated from the original metric measurements); feel free to adjust to your whim also.  I also increased the amount of peanuts used, as I wanted a real peanutty flavor, not just a faint scent.  And, boy, did this bread deliver!  It tastes like eating a bread peanut, you guys!  If that bothers you, don’t hesitate to decrease the amount a little.

The mostly whole wheat starter used in this recipe is fabulous for two main reasons: the whole wheat complements the flavor of the peanuts beautifully, and the texture also helps disguise any graininess that the freshly ground peanut meal might impart to a totally white flour bread.  It’s important that the whole wheat flour is used for the starter, because the overnight “soak” mellows any bitter flavors in the flour, and helps soften the bran in the flour, which might otherwise cut through your developing gluten (making the bread dense and tough).

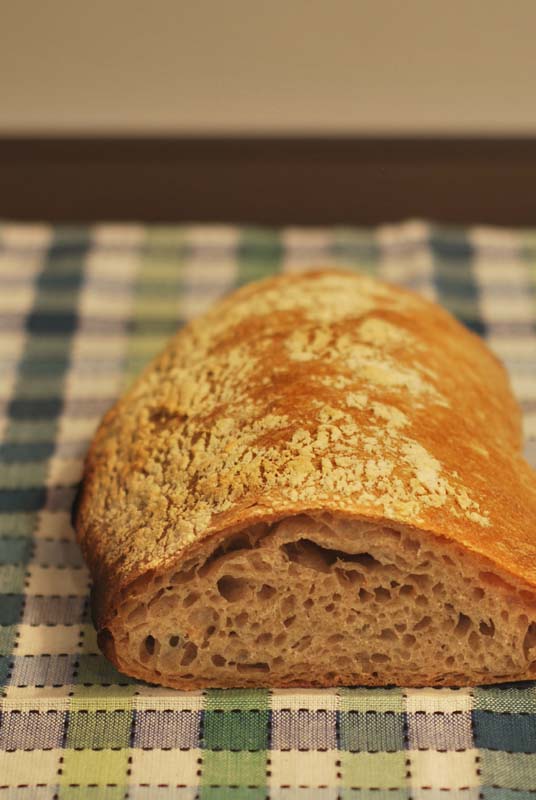
You can tell from the picture that there are lovely, giant holes in the bread; but unfortunately, they’re not really evenly distributed, they all clustered at the top.  This means that my dough was too wet, and the heavy bulk of the dough slumped down around those rising pockets of steam.  It’s important to listen to your dough, no matter what the recipe tells you to do!  The dough knows what’s going on far better than any sheet of paper!  If it tells you it’s too wet, then it’s too wet!

Overly-wet dough aside, this bread is really quite delicious.  The recipe instructs you to bake the bread at 475º F, which seems unreasonably high, possibly even a typo.  But it works perfectly, especially with such a wet dough.  Just trust me; it’s not going to burn your bread.  The crust turns out crisp and beautiful, and the crumb is airy, chewy, and delightfully full of holes (though the slices end up a bit misshapen).

And the flavor!  Oh, it really, truly does taste like the distilled essence of peanut, come into bread form.  If you like peanut, you really shouldn’t pass this up.  Need I suggest topping a slice with your favorite jam, or with a banana and honey?  Dare I mention Nutella?  Or using this bread as the base for your favorite Elvis-style sandwich?  Oh, now I’m getting hungry.

Good thing for me, though, that one of those three bakers, one member of Coupe-du-Monde-winning Team USA 2005 has a bakery not 15 minutes from my home!  Maybe I should try to convince Chef Downer to reprise this creation, so I can try the real thing!  Bennison’s ftw!


Peanut Bread
Adapted from Bread Bakers Guild Team USA 2005, via Breadcetera
Makes 2 loaves

For starter:
1 ounce (about 1/4 cup) unbleached all-purpose flour
5 1/2 ounces (about 1 cup plus 2 tablespoons) whole wheat flour
2/3 cup water, at room temperature
1/8 teaspoon instant yeast

For final dough:
1 1/2 ounces (about 1/3 cup) peanuts, toasted and ground finely (see note 1 below)
15 ounces (about 3 1/4 cups) unbleached all-purpose flour, divided
1 1/4 cups water, at room temperature
2 teaspoons kosher salt
½ teaspoon instant yeast

1.  To make the starter, whisk together the flours and the yeast.  Add the water and mix until smooth.  The starter will be stiff.  Cover with plastic wrap and let sit at room temperature overnight, or for about 12 hours.

2.  To make the final dough, prepare the peanuts as directed (see note 1 below).  Set aside.  In the bowl of a stand mixer, combine 12 ounces (about 2 1/2 cups) of the flour and all of the water.  Mix until all the flour is moistened.  Cover, and let stand at room temperature for 15 to 30 minutes.

3.  After the rest period (autolyse), add all of the starter, the yeast, and the salt to the flour mixture in the bowl.  Using the dough hook, mix at low speed until all the ingredients are fully incorporated, about 2 minutes.  Increase the speed to medium-low, and continue kneading until the dough clears the sides and bottom of the bowl, about 10 minutes.  Add the remaining flour by spoonfuls as needed to achieve the proper consistency; the dough should be slack but not wet, and should form a cohesive ball.  Reduce the speed to low, and add the peanut meal.  Continue mixing until all the peanut meal is evenly incorporated, about 3 minutes.

4.  Transfer the dough to a large, lightly oiled bowl.  Cover with plastic wrap and let sit for 30 minutes at room temperature.  Using a nonstick spatula, gently deflate and fold the dough over itself in a tri-fold (as though you were folding a letter).  Cover and let rise again for 30 minutes.

5.  Repeat the folding procedure, cover, and let rise 1 hour more.

6.  Repeat the folding procedure a third time, then turn the dough out onto a floured surface.  Divide the dough into 2 even halves.  Shape each into a round, cover loosely with plastic wrap, and let rest for 15 to 20 minutes.

7.  Shape each piece into a long, oval loaf, and transfer to a parchment paper-lined or lightly-greased baking sheet.  Dust liberally with additional flour, cover loosely with lightly oiled plastic wrap, and let rise until nearly doubled in size, about 45 minutes.  Preheat the oven to 475º F, along with a baking stone (if using).

8.  Bake the loaves at 475º F for 10 minutes, using your favorite steam technique (see note 2 below).  Continue baking for an additional 15 minutes, or until cooked through and browned.  An instant read thermometer should register about 200º F when done.  Remove to a wire rack, and allow the loaves to cool thoroughly before slicing.


Notes:
1.  To roast peanuts, spread evenly in a sheet pan and bake at 350ºF until fragrant, about 5 to 10 minutes.  Cool to room temperature, then grind into a fine meal, either by hand in a mortar and pestle, or in a food processor.  If you use a food processor, use quick pulses to ensure that the peanuts are not overprocessed into peanut butter.

2.  Unless you have a steam-injecting oven (and I’m coming over immediately), you might want to try one of these methods for getting steam onto your bread, and have the crispiest crust imaginable.  I prefer simply spraying the loaf itself with a fine mist of water from a squirt bottle before baking, and every 2 minutes thereafter, until the recipe says to stop.  You can also place a rimmed baking dish or other oven-safe pan on the floor of the oven to preheat along with it, and toss ice cubes into the hot pan when you place the dough in the oven, and replenish as they melt away.  Remove the pan when the recipe indicates to stop the steam.  There are other methods, but I find these to be the most effective.

Posted in Savory, Yeast Breads | Leave a comment

Almond Chickpea Flatbread

Week Twenty-Eight: Breads With Nuts

almond-chickpea

When I started thinking about almonds, and interesting breads that could be made with them, the possibilities seemed endless.  Almonds are perhaps the most-used nuts in baking, as their mild flavor blends well with myriad other ingredients, though it can easily stand on its own.  They can be used whole as an ingredient or as decoration, they can be sliced or chopped and used as a filling or a flavoring, or they can be ground into a fine meal and used as the base structure of a baked good, as in these gluten-free blueberry muffins I previously made.

But nothing really excited me – yeast breads with almonds seemed a little strange, but almond quickbreads were a little expected – until I remembered a recipe for a seductive almond curry on Melissa Kronenthal’s excellent blog, The Traveler’s Lunchbox.  (Yes, I’m still on that Indian food kick.  At this point, however, it’s become less of a “kick” and more of a “deeply abiding love”.)  Almonds and curry, how lovely!  I was also reminded of a favorite curry addition of mine, the chickpea.

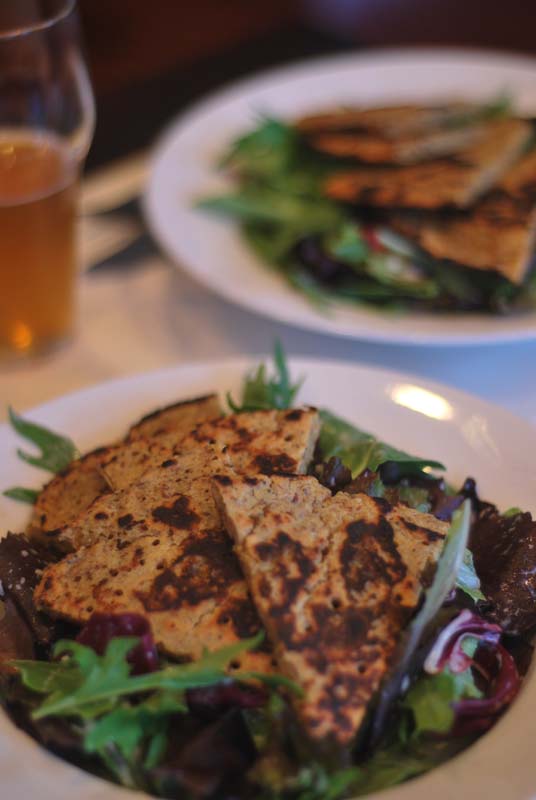
I wanted to utilize the almond’s ability to become a flour, an attribute conveniently shared by the chickpea.  One of my favorite breads so far this year was farinata, a chickpea-flour bread made in Northwestern Italy and Southeastern France (there, called socca).  I decided to make a sort of farinata variation, using part chickpea flour and part almond meal, and spicing things up with some flavorings borrowed from the almond curry: sesame and poppy seeds, cumin for smokiness, and a healthy dose of red pepper.  I meant to use coconut milk also, as I had some languishing in the refrigerator, but I actually forgot to use it.  Next time!

I actually had loads of problems with baking this bread, as my cast iron pan seems to have developed a devilish little spot that consistently sticks to things, and refuses to become seasoned properly.  Curses!  So eventually, I had to abandon that pan entirely, and resorted to cooking the bread in a nonstick pan on the stovetop, pancake-style.  This actually worked reasonably well, if a bit non-traditional for a bread of this type.  I think this style bread benefits from the extremely high heat achieved with cast iron in a very hot oven, as you really can’t get such a crisp crust with such a tender interior any other way.  But in a pinch, the stovetop method will produce something edible.

In the end, this bread was just okay.  I’m not sure if it was the lower heat that the stovetop method produced, or if the flavors were just not that compatible, but I wasn’t impressed.  Things tasted a bit muddied, nothing really stood out, and the flavors which should have been balanced in a lovely equilibrium were simply not.  I think I was trying for too much at the same time, and the bread would have benfitted from a little restraint.  And the inferior cooking method didn’t help, either.

We all have off days, and this was one of mine.  I’m giving you the recipe as I (should have) made it, with the oven method of cooking, but I don’t really recommend you try the ingredients as written.  Yet the concept of this bread intrigues me, so I do urge you to play around with it, make it your own!  Almonds and chickpeas seem like such a great combination, I’m don’t think I’m done with this one yet!  I hope you have better luck with it than I did!


Almond Chickpea Flatbread
Makes 2 to 3 nine-inch rounds

1 cup chickpea (gram) flour
1 cup almonds, toasted (or almond meal)
1 1/2 teaspoons kosher salt
1 teaspoon cumin, toasted and ground finely
1 1/2 teaspoons sesame seeds, toasted
1 1/2 teaspoons poppy seeds
1/4 to 1/2 teaspoon ground red pepper (such as cayenne)
1/2 teaspoon ground black pepper
1/4 cup olive oil, plus 2 to 4 tablespoons for oiling pans
1 1/2 cups water

1.  Set an oven rack in the top third of the oven.  Set a cast iron pan (see note 1 below) in the oven, and preheat to 475º F.

2.  If using whole almonds, grind them in a food processor in pulses until finely ground, but not until they make a paste.  Set aside.

3.  In a medium bowl, whisk the flour, ground almonds (or almond meal), salt, cumin, sesame seeds, poppy seeds, and peppers together.  Add the water and 1/4 cup olive oil, and whisk until smooth.  The batter should have the consistency of heavy cream.  If needed, adjust with extra chickpea flour or with extra water.  Cover with plastic wrap and let stand at room temperature for at least 30 minutes, or up to 3 or 4 hours.  Any longer than that, and the batter should rest in the refrigerator, but can sit there for up to 24 hours.

4.  Pour 1 to 2 tablespoons olive oil (depending on the size of the pan) into the hot pan.  Carefully tilt the pan to coat with the oil.  Pour the batter into the hot pan to the desired depth (see note 2 below).  Keep in mind the bread will not rise in the oven.

5.  Place the pan on the upper oven rack, and bake for about 5 minutes, or until firm to the touch.

6.  Turn the broiler on, and broil for 3 to 4 minutes, or until the bread begins to brown darkly in spots.  Remove the bread from the pan, and place on a wire rack to cool slightly.  Repeat the oiling, baking, and broiling procedure for the remaining batter.  Cut into wedges, or irregular shapes, and serve immediately.  These are best eaten fresh and warm, but may be cooled and frozen, wrapped tightly.


Notes:
1.  You can use any size cast iron pan.  Cast iron will best retain heat, and produce the best result, but if you don’t have one, or if you would prefer a giant, thin bread, you can use a pizza pan with a rim.  A cake pan will also do the trick.  But if you don’t have any of those, a rimmed baking sheet will do if all else fails; it will just end up rectangular.  In any case, you should heat the pan up with the oven.  Be warned that the high heat may warp a metal pan.

2.  You can make the bread any thickness you like, from crêpe-like thinness, to a hearty half-inch thickness.  Generally, though, thinner breads will cook more evenly.  For thicker bread, you may want to reduce the oven temperature to 450º F.

3.  If you have more than one pan, you can absolutely cook more than one at a time.

Posted in Savory, Unleavened Breads | Leave a comment

Macadamia Lemon Bread

Week Twenty-Eight: Breads With Nuts

macadamia

One of my goals this week was to find new ways of incorporating familiar nuts into a variety of breads.  When it came to the macadamia nut, I could think of one flavor combination that is so common as to be ubiquitous, and almost boring: macadamia and white chocolate.  Not that there’s anything wrong with it, exactly; it’s just that I’ve seen one too many institutionally-baked cookies with that flavor combination.  Blah.

But luckily, there’s something a little less expected out there, something that happens to go beautifully with the buttery flavor of a macadamia.  Yes, it’s that wonder of the culinary world, that saviour when all other seasoning fails, the humble lemon.  Lemon and macadamia are two of the best friends that you may never have met – as I for one don’t often see them paired alone (unless I missed something, but usually there’s coconut or some other tropical fruit sticking its big nose in there) – but they’re just delightful together.

Scouring my cookbooks, I luckily happened upon a recipe that combined these two chosen flavors in what looked to be a soft and lightly sweet bread, enriched with egg, milk, and yogurt.  Perfect!  The tanginess of the yogurt would complement the lemon, while the milk and egg would highlight the richness of the macadamia.  And after a few adjustments, I had what looked like a real winner.

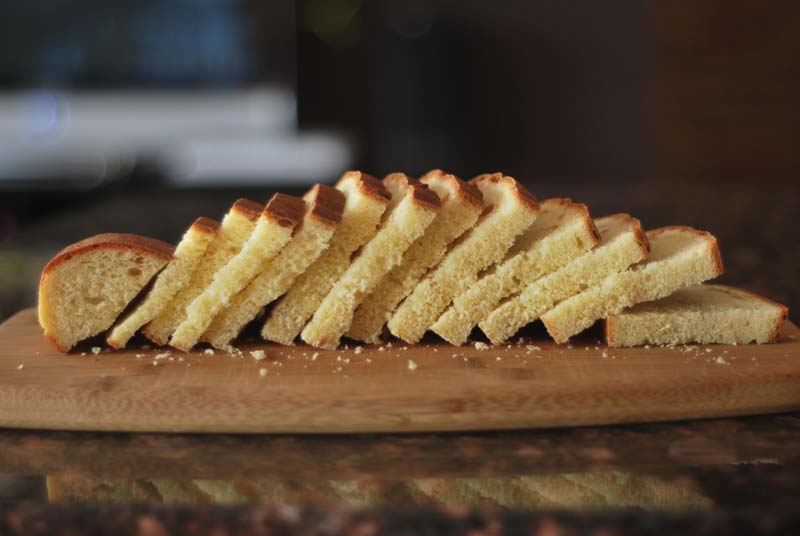
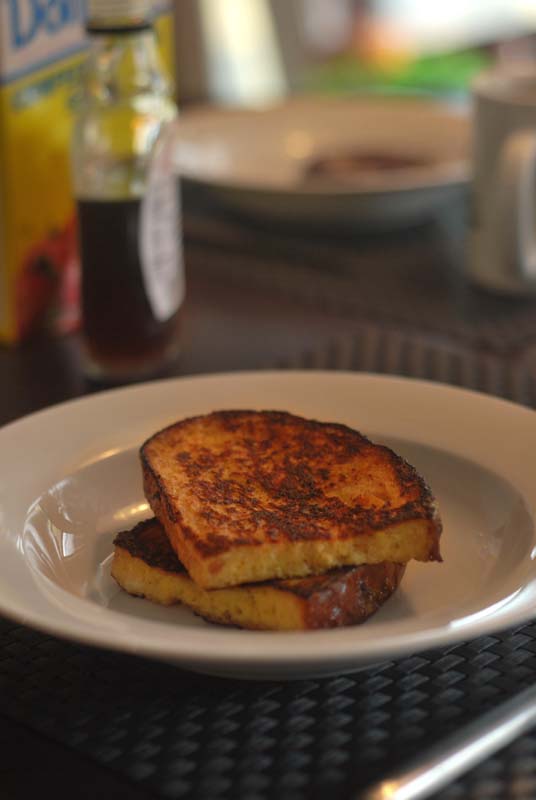
The bread baked into a rather convincing version of brioche, if not quite so flaky; this was a bit surprising, considering how little egg and milk were used.  The crust took on a gorgeous mahogany color, and lent a slight hint of caramel to the flavor.  The crumb was close, but airy, and the bread sliced beautifully.  To my palate, it tasted a tiny bit too dry to eat plain, but was just right when toasted and topped with a pat of butter.  I have plans to use it for some (hopefully) ridiculously good French toast tomorrow morning!

The overall flavor of lemon and macadamia was beautifully in balance, neither overwhelming or overpowering the other.  Speaking purely about the flavor of the bread itself, I might have put in more lemon, except that would have dominated too much, and rendered the loaf less versatile for use in other applications (such as French toast).  It was generally agreed that it would be best to add any extra lemon flavor through use of additional condiments or flavorings, such as by topping a slice with lemon curd, or garnishing French toast with lemon-maple syrup or lemony whipped cream.

Overall, this bread was just lovely.  It had the softness and slight sweetness of a traditional brioche, but without quite as much richness.  I can just see an afternoon cup of tea, or a breakfast Earl Grey, accompanied by a few slices of this bread, some butter, and lavender honey.  Light, lemony, buttery, and floral, how could you go wrong?

Edit: The French toast was amazing!  Try it, try it, try it!

macadamia-french-toast


Macadamia Lemon Bread
Adapted from Bread by Christine Ingram and Jennie Shapter
Makes 1 round

1/2 cup milk, at room temperature
1/2 cup plain yogurt, at room temperature
1 egg, at room temperature
2 tablespoons water (or less)
2 to 3 tablespoons light honey
14 ounces unbleached bread flour, plus extra for dusting
1 1/4 teaspoons instant yeast
1 scant teaspoon kosher salt
1/2 cup macadamia nuts, toasted and chopped
1 tablespoon finely grated lemon zest

1.  In a liquid measuring cup, whisk together the milk, yogurt, and egg.  If necessary, add enough water to measure up to 1 1/4 total liquid.  Add the honey and stir to combine.  Set aside.

2.  In the bowl of a stand mixer, whisk together the flour, yeast, and salt.  Add the milk mixture, and mix at low speed with the dough hook until the dough comes together, scraping the bowl if necessary.  Increase the speed to medium-low and knead until smooth and elastic, about 6 to 8 minutes.  You may need to add a spoonful or so of additional flour to achieve the proper consistency.  The dough should be a little slack, but not wet, and should clear the sides of the bowl.

3.  Turn the dough out onto a lightly floured surface.  Knead a few times, until a skin forms around the outside of the dough.   Pull the skin taught around the dough, forming a round ball.  Transfer the dough to a lightly oiled bowl, turning to coat all sides with the oil.  Cover tightly with plastic wrap, and let rise in a warm place until doubled in size, about 1 hour.  Or, you can refrigerate the covered dough for 8 hours or overnight (see note 3 below).  Let come to room temperature for at least 45 minutes before proceeding.

4.  Turn the dough out onto a lightly floured surface.  Press and roll the dough out flat, about 12 to 15 inches across, or as big as the dough will allow.  If the dough starts to resist, cover with plastic wrap and let rest for 10 minutes befor trying again.  Sprinkle the dough evenly with the macadamias and lemon zest.

5.  Fold the edges of the dough over the nuts and zest, so that they meet in the middle.  Press to seal.  Knead until the nuts and zest are evenly incorporated throughout the dough, sprinkling with additional flour as needed to keep from sticking (see note 4 below).  Form the dough into a round loaf, and transfer to a greased or parchment-lined baking sheet.  Cover loosely with lightly-oiled plastic wrap, and let rest in a warm place until doubled in size, about 1 hour.

6.  Preheat the oven to 400º F.  Bake for 30 minutes, or until well browned and baked through.  An instant-read thermometer should register about 190º F to 200º F when inserted into the center.  Transfer to a rack to cool thoroughly before slicing.  If you like a shiny crust, rub the crust with a little butter while still warm.


Notes:
1.  To toast macadamia nuts, chop before placing in a single layer on a sheet pan.  Bake at 350º F for 10 to 15 minutes, until golden and fragrant, stirring every 5 minutes to ensure even toasting.

2.  For best results, all your ingredients should come to room temperature for at least 30 minutes before using.  If you don’t think of it, you can microwave the milk and yogurt together for thirty seconds or so, just enough to take the chill off (but no hotter than 115º F).

3.  If you plan to refrigerate the dough overnight, you will achieve the best result by under-kneading the dough slightly (for 5 to 6 minutes).  The gluten will continue to strengthen overnight, and may over-develop if the dough is kneaded fully.  By under-kneading, you will help ensure the fluffiest texture in the finished bread.

4.  When kneading in the macadamias and lemon zest, use only enough flour to keep the dough from sticking to your hands and the counter.  The dough will be very sticky, but resist the temptation to over-flour, which will only lead to a tougher and less-moist bread.  You may elect to use a bench scraper to help with this kneading step.

Posted in Savory, Sweet, Yeast Breads | Leave a comment

Hazelnut Chocolate Berry Bread

Week Twenty-Eight: Breads With Nuts

 hazelnut

In the bakeshop, nuts are certainly a common ingredient.  Classically speaking, almonds and hazelnuts are the darlings of the confectionary world, but in American home cooking, you’ll most often find pecans and walnuts.  The reason for this is obvious: almonds and hazelnuts are commonly grown in Europe, whence cometh our classic pâtisserie.  In North America, however, pecans and walnuts are far more abundant, making them cheaper and more widely available.

And so, when you see a bread recipe that involves nuts, I’d wager it calls for pecans or walnuts 95% of the time.  Not only that, but most nut breads are quick breads, the common term for chemically-leavened breads.  What about all those other nuts out there, pistachios, macadamias, and pine nuts?  What about yeast-leavened breads?  Why won’t anyone think of them?!  So this week, I hope to provide you with some new and fresh takes on nut breads, making mostly yeasted breads, or some slightly unusual quick breads when appropriate.

The nut I’ve chosen to work with today is the hazelnut.  Yes, it was mainly because that’s the nut I had in most abundance in my freezer, and it was too late to run to the store; but it’s also because I love the flavor of hazelnut.  (Those two facts may or may not be related.)  Of course, we’re all aware that hazlenut + chocolate = a match made in heaven, so it seemed nothing short of foolish to stray from that pairing.  But I wanted to add a little edge to that combination, some flavor that’s a bit unexpected.

After a throwing an over-the-top ice cream sandwich party this weekend, I happened to have some homemade sauces left over: caramel, chocolate, and berry.  The chocolate and caramel sauces, while delicious, would’ve been a bit expected with hazelnut.  But the berry sauce – now that’s interesting!

Berries and chocolate go quite nicely together, as evidenced by the classic chocolate-covered strawberry, and the myriad chocolate-covered-whathaveyous on the market today.  Hazelnut and berry is an equally good, if slightly less well-known match; try looking for “hazlenut + berry” recipes sometime, they mostly look amazing!

So I had my flavors: chocolate, hazelnut, and berry.  A bit grudgingly, I decided the best medium to incorporate all those together was in a quick bread, not the least because the berry flavor was in sauce format.  [A quick note: this berry sauce was unbelievably easy and quick to make, and is wonderful for any application; but if you would rather not go to the trouble, you can use whole fresh or frozen berries instead.  I’ve given instructions for substitutions below.]  I also added a little black pepper to the mix to give a nice little kick to everything, as I love berries and black pepper together!

This bread baked into a slightly purple-tinted, close-crumbed bread that was quite easy to slice.  It ended up being moist, but not so moist that it fell apart as soon as you touched it, a welcome attribute.  The crust was properly under-crisp, as becomes a quick bread, and turned a deep brown.

As for the overall flavor, I’m sad to say that it was simply okay.  It was good, but wasn’t quite as soignée as I had hoped.  Perhaps there was a bit much chocolate, which muddied the bright berry flavors, or perhaps the earthy hazelnuts weighed things down as well.  I’m not really sure why, but it just didn’t do it for me.

It didn’t come out badly at all, but if I’m going to eat slightly purple bread, it had darn well better taste more refined than this did.  I may or may not give this one another shot sometime, but I think it needs more work than just one or two re-dos; I think it needs a total re-think.  In fact, these flavors may work quite well together (they sure did on a spoon!), but perhaps in a more strict pastry format, rather than a rustic quick bread.  I’ll keep you updated if anything changes with this one!


Hazelnut Chocolate Berry Bread
Makes one 9×5 loaf

2 cups unbleached all-purpose flour
1/3 cup brown sugar, packed
2 teaspoons baking powder
1/2 teaspoon baking soda
3/4 teaspoon kosher salt
1/4 teaspoon black pepper
2 eggs
1/2 cup vegetable oil
1/2 cup milk
1 1/2 teaspoons vanilla
1 1/2 cups hazelnuts, toasted, skinned, and chopped
3/4 cup chocolate chips, or chopped chocolate
1/2 cup berry sauce (recipe follows), or 6 ounces fresh or
         frozen berries of your choosing (see note 2 below)

1.  Preheat oven to 375° F.  Grease one 9 x 5 inch loaf pan.  In a bowl, whisk or sift dry ingredients (flour through black pepper) together.  Set aside.

2.  In another large bowl, whisk the eggs until blended.  Add the oil, milk, and vanilla, and whisk until incorporated.  Add the dry ingredients and gently combine until just moistened (some lumps and flour streaks are okay).

3.  Add the hazelnuts, chocolate, and berry sauce (or whole berries).  Fold together gently until incorporated.

4.  Pour the mixture into the prepared pan.  Smooth the top, and bake at 375° F for about 40 minutes, or until browned and fully baked.  When done, the top will feel firm when pressed lightly.  Let cool briefly in the pan before turning out onto a wire rack to cool fully.  Serve warm.


Quick and Easy Berry Sauce
Makes about 1 1/2 cups

1 cup blueberries (thawed if frozen)
1 cup blackberries
1/3 cup red currant preserves
1/2 teaspoon fresh lemon juice

1.  In a medium bowl, smash blueberries until broken up and juicy.

2.  Purée blackberries in a food processor or blender.  Strain into the smashed blueberries, removing and discarding any seeds.

3.  Add the preserves and lemon juice, and mix until smooth and combined.


Notes:
1.  To toast nuts, place in a single layer on a sheet pan and bake at 350º F for 10 to 15 minutes.  To skin hazelnuts, the common method is to place them in a towel and rub until the skins fall off.  I find this stains my towels, and prefer to use a plastic netting, such as brussels sprout or other vegetables are sold in.  Place the nuts in the netting, hold or tie the open end shut, and rub over the sink until the skins have all come off.  Some skins may remain; this is fine.

2.  If using fresh berries, give them a quick toss in flour to coat before stirring into the batter along with the nuts and chocolate.  Frozen berries need no advance preparation, and should be used unthawed.

Posted in Quick Breads, Sweet | Leave a comment