Roasted Tomato Basil Bread

Week Thirty-One: Breads With… Foods

tomato-basil

I never liked tomatoes while growing up.  I’m not sure what it was about them, but I just didn’t like them.  My mother never really cooked with them, aside from their inclusion in her beloved chili recipe; but that was in paste form, and you couldn’t exactly taste them, so it was okay.  Thinking back, it’s perhaps obvious why I never liked them, considering where I was most often exposed to them: squished between meat and bun on fast food sandwiches.

It feels like a public airing of dirty family laundry to admit it.  Yes, as a child, I most often saw tomatoes on my plate (as it were) at Rally’s.  No wonder I picked the sad things off, pinching each one with the tiniest edge of fingertips, avoiding as much contact as possible.  I eventually tired of constantly dealing with the poor things (that’s what I get for making a special order at a fast food restaurant), and would deign to eat them more and more frequently, eventually not even requesting their exclusion.

These days, in stark difference to my younger years, I love a good tomato.  There was never any satori-esque revelation of eating that first real tomato for me, nor am I really even sure when I started liking them.  I imagine it must have been shortly after I graduated from college, and may have involved a certain guy who claimed to “eat them like apples”.  Whatever the reason, I am now a sucker for the sweet acidity of a juicy summer tomato.  Not so much a devotée of the cooked tomato, I think there’s hardly anything better than a crisp, raw tomato, full of bright flavor that never lasts quite as long as you’d like.

Until now, that is.  Catching up on some (very) old magazines, I recently drooled over Molly Wizenberg’s article in last September’s issue of Bon Appétit.  In it, she paints her usual and stunning image, this time of the pomodori al forno from Café Lago in Seattle.  She speaks of begging for the recipe.  She speaks of overhearing a man claim it’s “the best appetizer in Seattle”, these humble plum tomatoes, roasted low and slow with olive oil and oregano, then layered with garlic and parsley.  For a girl like Molly, and for a food town like Seattle, that’s awfully big talk, especially about such a humble dish.  I had to try it.

This week’s theme was the perfect excuse to try a batch out, since I had already penciled in a tomato-basil combination.  I was dreading any monstrosity involving raw tomatoes, which would just turn to liquidy goo inside a loaf of baking bread, and hated to resort to leathery sun-dried tomatoes.  Besides, tomatoes are definitely in season right now; I had no reason not to try the recipe.  Fortunately, it made more than enough roasted tomato for the bread, leaving plenty left over to provide fodder for my overactive culinary imagination.

It’s a good thing, too – they’re just as amazing as promised.  Soft without ever turning mushy, intense without ever overpowering, these are the best cooked tomatoes I think I’ve ever had.  In the soft heat of the oven, hey somehow pull into themselves, intensifying their essence, and flavor the olive oil at the same time.  They’re gorgeous.

Thinking that the moisture-rich tomatoes would weigh down a yeast bread, I opted to include them in a savory quick bread, brightened with the flavor of fresh basil.  I used a bit of whole wheat flour to lend a rustic characteristic to the bread, to complement the homey tomatoes, and to give a little more hearty support.  The oil used in the bread is the olive oil used to roast the tomatoes, adding an extra level of flavor throughout every bite.

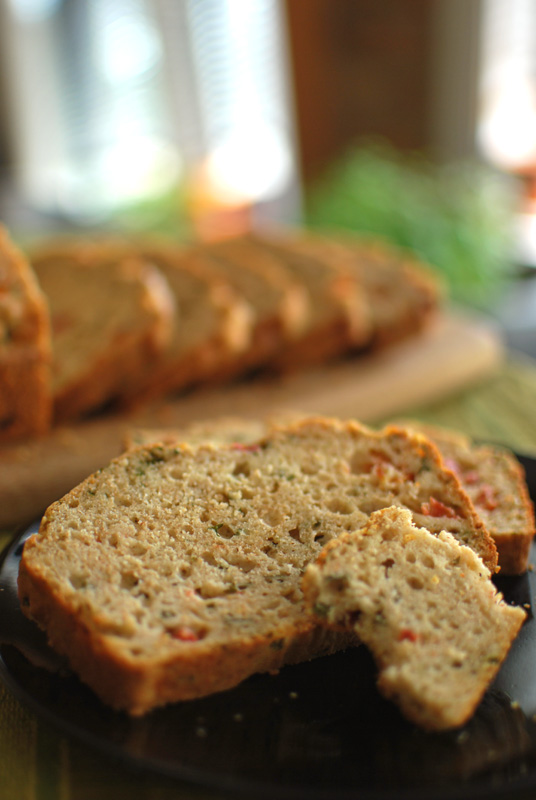
While baking and cooling, the bread smelled nothing short of heavenly.  A mixture of slow-roasted tomato, basil, and fresh bread filled the kitchen, making it very difficult to wait out the required cooling period.  When sliced, the tomatoes dotted each piece in a lovely mosaic.  And the taste!  Lightly grainy, it was fresh with basil, but overall the flavor was of rich, full tomato, the sort of depth you know that has taken no shortcuts.  The interior was soft, with a pleasant crunch to the crust surrounding it.  It was just as I hoped it would be, and it was delicious.

This is not the fastest “quick bread” to make, considering the 2 to 3 hours needed for roasting the tomatoes; and you could easily take the shortcut of using oil-packed sun-dried tomatoes instead.  But then there’d be no leftover roasted tomatoes hanging about your kitchen, and that, Gentle Reader, would be the real tragedy.  Take it from a tomato-lover who knows.


Roasted Tomato Basil Bread
Makes one 9 x 5 inch loaf

For roasted tomatoes:
1 cup olive oil, divided
2 pounds plum tomatoes, halved lengthwise, seeded
1 1/2 teaspoons dried oregano
3/4 teaspoon sugar
1/2 teaspoon salt
2 garlic cloves, minced
1 tablespoon minced fresh Italian parsley

For bread:
6 1/2 ounces (1 1/2 cups) unbleached all-purpose flour
3 1/2 ounces (3/4 cup) whole wheat flour
2 1/2 teaspoons baking powder
3/4 teaspoon salt
2 to 4 tablespoons chopped fresh basil, or 1 to 2 tablespoons dried
2 large eggs
1 cup milk
1/4 cup olive oil from roasted tomatoes
5 roasted tomatoes halves, chopped (about 1/2 cup)

1.  To roast tomatoes, preheat oven to 250° F.  Pour 1/2 cup olive oil into a 13 x 9 x 2 inch glass or ceramic baking dish.  Place the tomatoes in the dish, cut side up.  Drizzle with the remaining 1/2 cup olive oil, and sprinkle evenly with oregano, sugar, and salt.  Bake, uncovered, for 1 hour.

2.  Using tongs, gently turn the tomatoes over.  Bake 1 hour longer.  Turn tomatoes over again, and bake until they are deep red and very tender, about 15 to 45 minutes more, depending on the ripeness of the tomatoes.  Remove from oven.

3.  Gently turn tomatoes over again, and pull off skins, which should slide off easily.  Discard the skins.  Layer the tomatoes in non-reactive medium-sized bowl, sprinkling garlic and parsley over each layer.  Drizzle the tomatoes with the oil left in the baking dish, until fully covered.  Cover loosely, and let stand at room temperature for 2 hours.  At this point, cover tightly and chill up to 5 days.

4.  Position a rack in the lower third of the oven.  Preheat the oven to 350º F, and grease an 9 x 5 inch loaf pan.

5.  In a large bowl, whisk together the flours, baking powder, salt, and basil.  Set aside.  In a liquid measuring cup, mix eggs, milk, and olive oil (from the roasted tomatoes) together to blend.  Coarsely chop 5 of the roasted tomato halves.

6.  Add the milk mixture to the flour mixture, and fold until about three-quarters of the dry ingredients are moistened.  Add the tomatoes, and fold just until the pieces are distributed and the dry ingredients are moistened; the batter may be stiff.

7.  Scrape the batter into the prepared pan and spread evenly.  Bake until a skewer inserted in the center comes out clean, about 45 minutes, or until golden brown.  Let cool in the pan on a rack for 5 to 10 minutes before removing from the pan to cool completely on the rack.


Notes:
1.  A note from Molly W.: If you’re making the roasted tomatoes outside the height of tomato season, use best-quality canned, such as Alta Cucina, Muir Glen, or Hunt’s.

2.  You will not use all the roasted tomatoes for this recipe, leaving plenty left over for tossing with pasta, or serving with bruschetta.  Bring tomatoes only to room temperature before serving as an appetizer, leaving oil in the refrigerator.

3.  A word on botulism: while botulism poisoning is rare, storing whole cloves of garlic in oil at room temperature is a good way to grow the botulinum toxin.  Please do not store the roasted tomatoes at room temperature!  I do, however, consider this recipe safe if the following precautions are taken: 1) that the garlic is chopped into very small pieces (reducing the habitat for any toxin that may be present), 2) that the mixture is stored in the refrigerator, and 3) that it is consumed within 1 to 2 weeks.  Considering that the toxin does not grow well at pH levels below 4.6, and that tomatoes are consistently around 4.0 to 4.11 on the pH scale, I feel that the tomatoes help by increasing the acidity of the mixture.  If you are very concerned, or would be feeding this to very small children or elderly people (whose immune systems may be compromised), you can use garlic powder instead of fresh garlic.  Alternatively, chopped or whole cloves of garlic may be roasted with the tomatoes, to flavor the oil, then strained out and discarded (or eaten immediately) before storing the tomatoes.  For fairly thorough discussion on botulism, garlic, oil, and the risks involved, see this link.

Posted in Quick Breads, Savory | 2 Comments

Mushroom Semolina Corn Muffins

Week Thirty-One: Breads With… Foods

mushroom-semolina

A few weeks ago, I featured a week of breads made with fruits, followed by a week of breads made with vegetables.  But during those two weeks, I ran across many foods that can’t be tidily classified as either.  The tomato, for example, is a fruit, botanically speaking; but who really uses it as such?  What about pumpkin?  Because of the seeds on the inside, it caused a gentle ruckus when I announced my intention to use it as a vegetable.  Oh, and let’s not even start on the discussion of eggplant, which is technically a berry.

So this week, I’m focusing on all those orphan foods that aren’t quite vegetables or fruits, but fall somewhere in between.  I’m kicking it all off with one of my favorite non-vegetables, the mushroom.  Technically, a mushroom is a “spore-bearing fruiting body of a fungus”*; so does that mean it’s actually a fruit?  I think that might be stretching it (what’s the difference between a “fruiting body” and a “fruit”?).  I may not know precisely what they are, but I do know that I adore mushrooms.  I can’t possibly imagine why people don’t like them, but I know many who don’t.  That’s fine; it means more mushrooms for me.

One delightful pairing with mushrooms is the sweetness of corn, both of which have a natural affinity for butter.  You can find recipes from here to next week that combine these; but oddly, only rarely in a bread format.  I’ve seen polenta with mushrooms, corn chowder with mushrooms, cornbread and mushroom stuffing, but not much bread as such.  Time to rectify that!

With this bread, I wanted not only to use corn, but also to pay light homage to a favorite dish of mine, pasta with mixed sautéed mushrooms.  Rather than choose one or the other, I decided to combine my favorite cornbread recipe with a semolina-based bread I’d made previously, and create semolina cornbread.  (Turns out someone had beat me to the idea.  C’est la vie.  But I has mushrooms!)

The mushrooms are lightly sautéed in butter or olive oil, whichever you prefer, and seasoned with thyme for a little background herbal flavor.  You can certainly add a bit of Sherry or cream as they cook, neither of which would be out of place.  Bourbon would be another excellent choice, and I was very tempted, but I decided to stay plain with these and see how it turned out.

The end result was exactly what I was going for.  Or, it would have been, had I remembered to include the salt.

Yes, I forgot the salt, and you could really tell.  My first bite told me things weren’t right.  Oh, the texture was spot-on crunchy and tender, just barely sweet enough, full of mushroom flavor; but yet, it was all somehow flat and dry.  My eyes closed in slow-motion as I realized what I had done, and I wondered how I had made such an elementary error.  So I did what any cook would’ve done – I picked up the salt shaker.

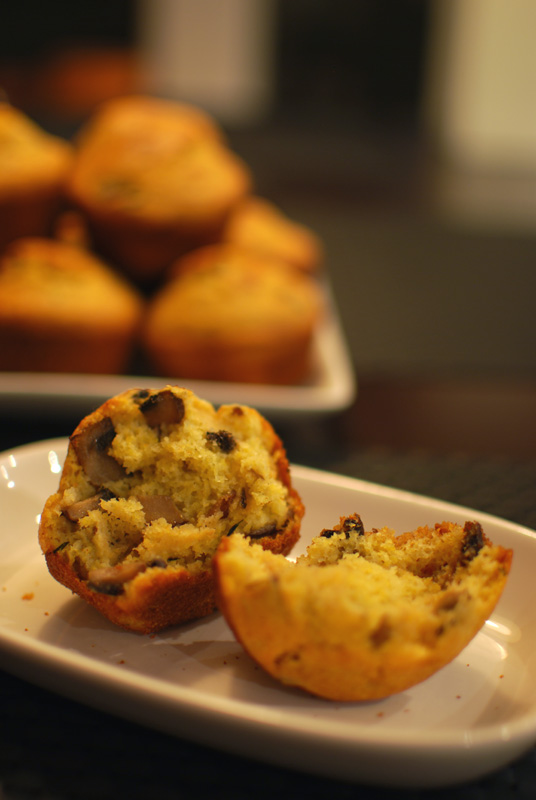
A pinch of salt made things right; the seemingly-dry texture of semolina and cornmeal changed magically into a pleasant and toothsome bite, the dull mushroom turned, Cinderella-style, into a rich, earthy lustre, and I knew I had a winner on my hands.

Adding flavorful ingredients to cornbread is a common and wonderful way to add some zing to an otherwise plain bread; and if you like mushrooms at all, I highly recommend trying this recipe.  The thyme flavor is subtle here, and I wouldn’t hesitate to add more if you like; feel free to substitute rosemary, mint, or any other favorite herb in its place.

Just don’t forget the salt.


Mushroom Semolina Corn Muffins
Makes 12 muffins

1/2 to 3/4 pound mixed mushrooms (button, cremini, oyster, etc.), chopped into small pieces
2 to 3 tablespoons butter or olive oil
1/4 teaspoon dried thyme
3/4 cup yellow cornmeal
3/4 cup unbleached all-purpose flour
1/2 cup semolina flour
2 teaspoons baking powder
1/2 teaspoon baking soda
1 heaped tablespoon sugar
1/2 teaspoon salt
2 large eggs
1 cup buttermilk
1/3 cup milk
2 tablespoons unsalted butter, melted, plus extra for greasing pan

1. Adjust oven rack to center position and heat oven to 425 degrees.  Grease a 12 cup muffin tin.

2. Heat a large, nonstick pan over high heat.  Add 1 tablespoon of butter or olive oil; heat until hot but not smoking.  Add enough chopped mushrooms to cover the bottom of the pan, about a third or half of the mushrooms.  Toss or stir until coated, and add a pinch of salt.  Cook, stirring or tossing, until lightly browned and softened.  Remove to a bowl.  Repeat with remaining mushrooms.  Add thyme, stir, and let sit until slightly cooled.

3.  In a large bowl, whisk together cornmeal, flour, semolina, baking powder, baking soda, sugar, and salt.  Set aside.

4.  Lightly beat eggs, buttermilk, and milk together.  Add egg mixture to the dry ingredients, and stir quickly until almost combined.  Add mushrooms and melted butter, and stir until ingredients are just combined.

5.  Divide batter evenly among greased muffin cups.  Bake at 425º F until golden brown and lightly cracked, and edges have pulled away from the sides of the pan, about 20 minutes.

6.  Transfer pan to wire rack to cool slightly, about 5 minutes.  Remove from tins and serve warm.


Notes:
1.  Muffins can be stored, wrapped in foil, for up to 1 day.  If not eating within that time, freeze.  Reheat muffins in a 350º F oven for 5 to 10 minutes, or until heated through.

2.  No buttermilk?  Warm 2/3 cup of milk in the microwave for 30 seconds, then add a splash of white vinegar.  Let it sit for five minutes, then use as directed.

3.  The amount of mushrooms used here is variable; use the lesser amount for a more subdued flavor, but use the larger amount for big mushroom flavor.


* – Quoted from Wikipedia.

Posted in Quick Breads, Savory | Leave a comment

Dog Biscuits

Week Thirty: Dog Biscuits

simon-biscuits

simon

Oh, I can’t resist a pun.

What better way to end a week of biscuits than with a treat for those happy little guys who make walking through the door every day such a pleasure?  Full disclosure: no, I don’t have a dog.  But there are two smiling, fuzzy, gray faces that welcome me every day when I come home, and spoiling them lightly is a chief pleasure of mine.  Yes, I’m a cat person, no question; but I understand that there are people who like dogs just as much.  To each his own.  So for those of you out there who love your puppies as much as I love my kitties, here’s something just for you.

I’m sure a few of you are wondering why on Earth anyone would make their own dog biscuits.  After all, they sell them in the store, don’t they?  I say, if you’d happily make a special dinner for your human loved ones, why not put out a little extra effort for someone who loves you so much, who just happens to have four legs?  And not to lay a guilt trip on anyone, but I suggest you check out the ingredient list on those boxes of national brand dog treats sometime.  I’m just saying.

Now, I don’t have a dog to test these out on, Simon up there looked rather disappointed with that plateful of carbohydrates, and Edgar down there just hid, so I can’t vouch for pet approval just yet.  But considering that these are made with human-grade foods from my own kitchen, I took it upon myself to taste test.

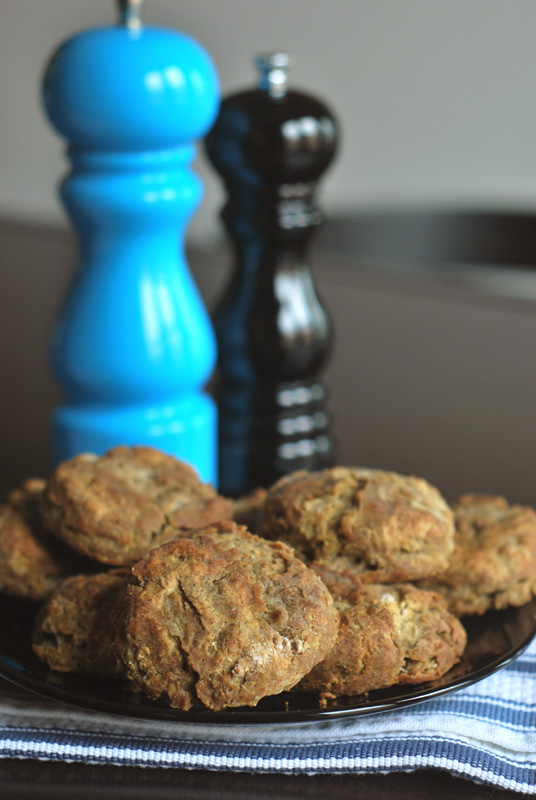
The biscuits turned into a crunchy, pleasantly grainy cracker-type product, with a nicely balanced taste, punctuated here and there with a bright mint flavor.  As far as human snacks go, this is a winner.  I would definitely serve these with some hummus for a delightful and easy repast.  I’m not sure how typical dog biscuits taste, so I can’t really compare on that level, but I imagine a dog would like these.

Obviously, you can alter the flavor as you like to fit your canine’s preferences.  If your dog likes peanut butter or cheese, throw some in.  Have some bacon lying about?  I’m positive your dog will love it.  (It even sounds pretty good to me.)  I make no guarantees about how long they will stay good at room temperature with such additions, though; you may want to store those in the refrigerator or freezer in that case.

I suggest, if you try these for humans or dogs, to roll them out rather thickly, about 1/2 inch or so, then cut into however small sizes you like.  I happen to have a dog bone cookie cutter, which is on the large side, so I rolled many of mine thinner in an attempt at a reasonable portion.  These thinner biscuits, however, ended up puffing and over-browning in the oven, making them look less than appealing (though they tasted fine).  I had no such problems with the thicker batch.  And remember, there’s no need for any cookie cutters at all; your dog really doesn’t care what shape they are.

edgar-biscuits

edgar


Dog Biscuits
Makes about 50 biscuits

4 ounces (about 1 cup) rolled oats
6 ounces (about 1 1/2 cups) unbleached all-purpose or bread flour
9 ounces (2 cups) whole wheat flour, plus extra for rolling
2 ounces (about 1/2 cup) toasted wheat germ
2 tablespoons powdered milk
1 teaspoon salt
2 tablespoons dried mint (optional)
1 stick (1/2 cup) unsalted butter, melted and cooled
2 tablespoons honey
2 large eggs, beaten lightly
1/2 cup water, at room temperature

1.  In a food processor, pulse the rolled oats until ground finely.  Transfer to a large bowl.  Add remaining flours, wheat germ, powdered milk, salt, and mint (if using).  Whisk together until blended.

2.  In a liquid measuring cup, mix together the butter, honey, eggs, and water until blended.  Add to the flour mixture, and stir together until a dough forms.  Turn out onto an unfloured work surface and knead until smooth (dough should be stiff).  Flatten slightly, cover with plastic wrap, and let sit for 20 minutes.  Preheat the oven to 325º F.  Lightly oil two large baking sheets, or line with parchment paper.

3.  Dust the work surface with whole wheat flour.  Using a floured rolling pin, roll the dough out to about 1/2 inch thick.  Cut shapes with a cookie or biscuit cutter, or cut into squares with a pizza cutter or knife.  Transfer biscuits to the prepared baking sheets.  Gather scraps, knead to combine, and repeat rolling and cutting.

4.  Bake the biscuits at 325º F for 30 to 45 minutes, or until browned and thoroughly dried and hard.  Let cool on sheets, and store in an airtight container at room temperature.


Notes:
1.  You can use fresh mint instead of dried, or substitute parsley.  Both will freshen the breath just as well.

2.  Feel free to use any mixture of various grains you like, instead of just using wheat flour.  The only caveat is that dogs are often allergic to or cannot properly digest corn, so I would warn you against cornmeal.  And no chocolate, please!  Theobromine and caffeine, found in chocolate, are both highly toxic to dogs.  The darker the chocolate, the more of both; and the smaller the dog, the greater the effect.

Posted in Savory, Unleavened Breads | Leave a comment

Angel Biscuits

Week Thirty: Biscuits

angel-biscuits

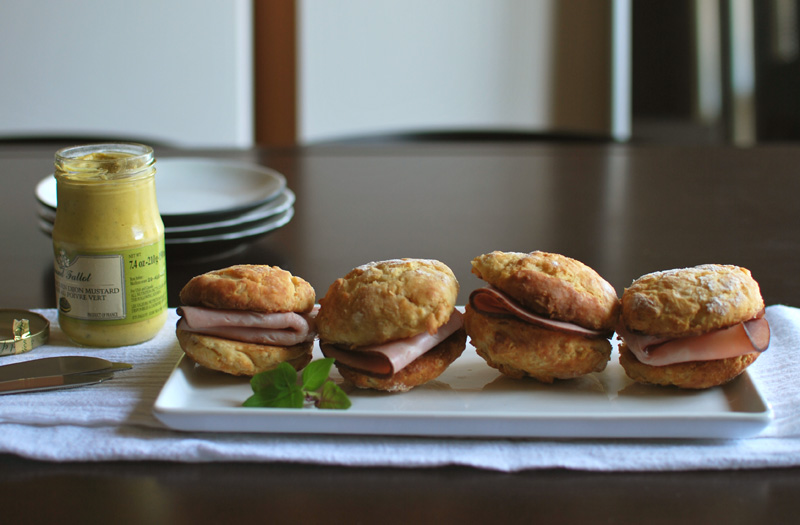
Southerners, with their soft white flour, have had a long love affair with the biscuit, and jump on every recipe that promises to deliver the lightest, fluffiest, softest biscuit ever.  To many, myself included, there’s not a whole lot that can beat a breakfast of biscuits with slices of good ham nestled inside, perhaps with a dollop of grainy mustard.  Actually, forget breakfast, that’s good any time of day.

If you’re from the South, you may have heard of angel biscuits.  But if you’re not, or if you somehow simply haven’t heard of them, you’ve been missing out.  Angel biscuits have been floating around the South, passed from cook to cook, since at least the 1950’s, though they achieved much greater popularity after fairly widespread publication in the 1970’s.

The major difference between typical biscuits and angel biscuits is the use of yeast.  Yes, angel biscuits are yeasted biscuits, which means there’s actually three kinds of leavening going on: yeasted, chemical (baking soda and baking powder), and physical (steam from melting butter and shortening).  With all this help, it’s no wonder they’re also known as “bride’s biscuits”, implying that even a newlywed kitchen novice could make light biscuits with this recipe.

Many versions of this recipe call for active-dry yeast to be dissolved and proofed in warm water before adding to the otherwise-typical mix of cold butter, flour, and cold buttermilk.  But this seems a bit counterintuitive to me; good, flaky biscuits need solid (cold) fat.  If you add warm liquid to it, you’re going to melt the fat.

However, yeast needs one of two things to grow: warmth or time.  Considering that the intended result is a biscuit, I’m going to say that it’s more important here to keep the fat cold.  In light of this, I’ve used instant yeast, which can be directly mixed into the flour, no proofing needed.  Because there’s no warmth to activate it, this yeast now needs time to do its thing, hence the overnight rest after mixing the dough.  Yes, I’m fully aware that an overnight rest rather negates the innate speed of a standard biscuit.  But sometimes, for fluffy biscuits, we must do what we must do.  Besides, you don’t actually have to rest it overnight; it’s just the best way to get the maximum lightness.

Do bear in mind that this method won’t produce the flakiest biscuits ever, but it will make soft angel biscuits that justly earn their name.  I’m certain any Southern cook would approve – especially if you serve them with a plateful of good ham!

ham-angel-biscuits

Angel Biscuits
Makes about 20

1/4 cup chilled vegetable shortening
4 tablespoons (1/2 stick) cold unsalted butter
10 ounces (2 1/2 cups) cake flour
1 1/2 teaspoons instant yeast
2 tablespoons sugar
1 1/2 teaspoons baking powder
1/2 teaspoon baking soda
1 teaspoon salt
3/4 cup cold buttermilk, plus extra for brushing biscuits

1.  Preheat oven to 425° F.  Grease a large baking sheet, or line with parchment paper.  Cut the butter and shortening into as small pieces as possible.  Pile loosely on a small plate and freeze while preparing remaining ingredients.

2.  In a large bowl, sift together the flour, yeast, sugar, baking powder, baking soda, and salt.  Add partly-frozen butter and shortening.  Moving quickly, toss and pinch butter and shortening into flour with fingertips, until the mixture resembles coarse meal.  Large flakes or pea-sized lumps are just fine.

3.  Add the buttermilk to the flour mixture, and fold quickly but gently with a fork or nonstick spatula until all dry ingredients are moistened and a rough dough forms.

4.  Turn the dough out onto a floured work surface.  With floured hands, press the dough together into a cohesive mass.  Liberally dust the top with flour, and fold the dough in half (you may need to use a bench scraper to help with this).  At this point, the dough may be refrigerated, wrapped in plastic wrap, at least 8 hours and up to 2 days.  Let come to room temperature for 20 to 30 minutes before proceeding.

5.  Using a rolling pin, and dusting with flour as needed to prevent sticking, gently roll the dough out to about 1/2 inch thick.  Using a round cutter, and cutting decisively, cut as many biscuits as you can, cutting each out as closely as possible to the next one.  Do not twist the cutter.  Transfer the biscuits to the prepared baking sheet, placing them so they just touch.

6.  Gather scraps together by gathering in from the sides, pressing the cut sides together.  Do not re-knead or re-roll for the best results.  Form biscuits from scraps either by hand-shaping or by cutting.  Transfer scrap biscuits to the prepared baking sheet, placing them so they just touch.  Cut-out biscuits can be frozen at this point, for up to a few weeks.  Do not thaw before baking.

7.  Bake biscuits at 425° F for 10 to 15 minutes (15 to 20 minutes if frozen), or until lightly browned on top.  Let cool on the pan for a minute or so, then transfer biscuits to a wire rack to finish cooling.  Serve warm.

Notes:
1.  Cooked biscuits can be stored at room temperature, wrapped tightly in aluminum foil, for 6 to 8 hours.  Before serving, rewarm in a 350° F oven for 5 minutes.  If not eating within that time, freeze, wrapped in foil.  To serve, bake unthawed and unwrapped, for 10 minutes at 350° F.

Posted in Quick Breads, Savory, Yeast Breads | Leave a comment

Buckwheat Pepper Biscuits

Week Thirty: Biscuits

buckwheat

One easy way to change the flavor and character of a biscuit is to substitute a different grain for some of the wheat flour.  In the South, also known as the Land of Biscuits, people have long been making biscuits with cornmeal added to them.  These are quite good when used as a topping for a casserole, or lightly sweetened and used on a cobbler or crisp; but they’re transcendent simply with butter and honey.  Need I mention a pairing with barbecue?

And as much as I wanted to make cornmeal biscuits, that wonderful middle ground between biscuit and cornbread, as much as I wanted to enjoy a pleasant breakfast or two of coffee and a sunshine-yellow cornmeal biscuit, as much as I wanted an excuse to slow-cook a pork shoulder, I just couldn’t do it.

This is the reason.  And this.  And this.  And these guys, too.  The one thing all those recipes have in common is that they necessitated the purchase of strange and unusual flours.  (It’s for the blog!  Why not?)  When I counted this morning, I had at least 14 different kinds of flour in my cabinet.  Fourteen!  Who does that?

And so, I’m beginning the slow march towards a cleaner pantry.  I will use all these flours, come hell or high water.  And I started today, with the buckwheat flour.  No, these aren’t very similar to cornmeal biscuits, but they do use the same principle of adding a different grain to get a totally different biscuit.  I figured it was as good a place as any to start.

After bidding a fond adieu to the charmingly rustic cornmeal biscuits in my mind, I turned my thoughts to a more cosmopolitan biscuit.  If I was going to give up those carefully-plotted breakfasts (I was going to maybe even go out and buy a newspaper!), I wanted something darned special in return.

Knowing that buckwheat and salmon could hardly be better friends, I was enticed by images of smoked salmon ribboning over the edge of a tiny buckwheat biscuit, bending under the feather-weight of a homemade yogurt garnish.  And certainly a heavy pinch of black pepper in the dough would add the soignée touch that would elevate these biscuits to black-tie status.  For these, I was willing to give up cornmeal biscuits.

The end result was exactly what I had conjured: an earthy, blini-inspired take on ordinary biscuits, crisp-edged and tender inside, with a building heat from the black pepper that makes you sit up and pay attention.  Bold and unassuming at the same time, potent and sophisticated, they’re the biscuit counterpart to that sneakily-lethal cocktail, the addictive French 75.  You don’t need salmon to enjoy these biscuits, as they were a lovely match for a thick cup of coffee at breakfast, but it certainly wouldn’t hurt if you had some lying around.

As much as I do enjoy cornmeal biscuits, they can wait.  I figure there’s plenty of cold weather up ahead that will be begging for any excuse to heat things up with a nice bit of pork in the oven, roasting away for hours on end.  Until then, I’ll just enjoy this gorgeous summer warmth with an excuse to cure a side of salmon with lemon and dill, stashed safely in the refrigerator!


Buckwheat Pepper Biscuits
Adapted from Crescent City Collection: A Taste of New Orleans, by the Junior League of New Orleans
Makes about 15

6 tablespoons cold unsalted butter
6 ounces (1 1/3 cups) unbleached all-purpose flour
3 ounces (2/3 cups) buckwheat flour
1 teaspoon baking soda
1 teaspoon baking powder
1/4 teaspoon salt
1/2 teaspoon ground black pepper
2/3 cup cold buttermilk

1.  Preheat oven to 400° F.  Grease a large baking sheet, or line with parchment paper.  Cut the butter into as small pieces as possible.  Pile loosely on a small plate and freeze while preparing remaining ingredients.

2.  In a large bowl, whisk together the flours, baking soda, baking powder, salt, and pepper.  Add partly-frozen butter and moving quickly, toss and pinch butter into flour with fingertips, tossing the mixture around to be sure to reach all pieces of butter, until the mixture resembles coarse meal.  Large flakes or pea-sized lumps are just fine.

3.  Add the buttermilk to the flour mixture, and fold quickly but gently with a fork or nonstick spatula until all dry ingredients are moistened and a rough dough forms.

4.  Turn the dough out onto a floured work surface.  With floured hands, press the dough together into a cohesive mass.  Liberally dust the top with flour, and fold the dough in half (you may need to use a bench scraper to help with this).

5.  Using a rolling pin, and dusting with flour as needed to prevent sticking, gently roll the dough out to about 1/2 inch thick.  With a round cutter or a small drinking glass, and using a decisive stamping movement, cut as many biscuits as you can, cutting each out as closely as possible to the next one.  Do not twist the cutter.  Transfer the biscuits to the prepared baking sheet.

6.  Gather scraps together by gathering in from the sides, pressing the cut sides together.  Do not re-knead or re-roll for the best results.  Form biscuits from scraps either by hand-shaping or by cutting.  Transfer scrap biscuits to the prepared baking sheet.

7.  Bake biscuits at 400° F for 15 to 20 minutes, or until lightly browned on top.  Let cool on the pan for a minute or so, then transfer biscuits to a wire rack to finish cooling.  Serve warm. 


Notes:
1.  Biscuits can be stored at room temperature, wrapped tightly in aluminum foil, for 6 to 8 hours.  Before serving, rewarm in a 350° F oven for 5 minutes.  If not eating within that time, freeze, wrapped in foil.  To serve, bake unthawed and unwrapped, for 10 minutes at 350° F.

Posted in Quick Breads, Savory | Leave a comment

Sweet Potato Biscuits

Week Thirty: Biscuits

sweet-potato

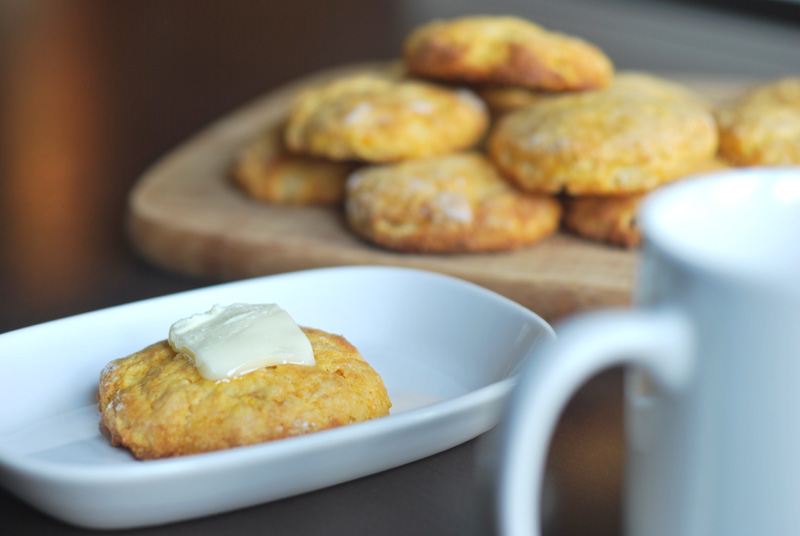
I’ve said it before, and I’ll say it again: I don’t think there’s a man, woman, or child in this country that doesn’t enjoy a good biscuit.  But sometimes, you want something a bit more special, a bit more interesting than simply a plain biscuit, as good as it may be.

Enter the sweet potato biscuit.  Known in the South for ages, the sweet potato biscuit has only fairly recently made its way above the Mason-Dixon line, charming palates and winning hearts all the way.  The idea is simple: biscuit + sweet potato = sweet potato biscuit.  But how such a simple addition can result in something so universally beloved, so scrumptious, is still a mystery.

Adding sweet potato to a biscuit adds a gorgeous orange hue and an earthy, lightly sweet flavor, one that goes perfectly with a slice of good ham and a spot of mustard or horseradish (or both).  It also makes for a more tender biscuit, as it adds moisture, and – to a much lesser extent – the fibrous sweet potato helps shorten any strands of gluten that form.  This is not license to over-knead or over-work your biscuit dough; but it does help a little, and every little bit helps with biscuits.

These biscuits are, of course, an excellent addition to any brunch menu, sunny, cheerful, and wholly welcoming, stacked high on a plate.  But as good as they are with simply butter and a cup of coffee, they’re just as good used for more savory applications.  Try serving them with a seared duck breast, perhaps with a bit of cranberry (or any other tart berry) sauce on the side.  If you prefer your lily gilded, throw a pinch or two of cayenne pepper into the dough.  Sweet potatoes and cayenne are best friends, and would be just heavenly topped with a blushing slice of duck.  My mouth is watering!


Sweet Potato Biscuits
Makes about 16

1 large or 2 small sweet potatoes
3/4 to 1 cup cold milk, plus extra for brushing tops
5 tablespoons cold unsalted butter
8 ounces unbleached all-purpose flour
1 tablespoon baking powder
1/2 teaspoon salt

1.  Preheat oven to 400° F.  Pierce sweet potatoes a few times with a fork.  Wrap tightly in aluminum foil, and bake for 45 minutes to 1 hour, or until very soft.  Let cool, and remove skin.

2.  In a glass measuring cup, mash 1 cup of cooked sweet potato.  Stir in the milk, a little at a time, until the mixture measures 1 3/4 cups.  Place mixture in the refrigerator to chill while preparing other ingredients.

3.  Grease a large baking sheet, or line with parchment paper.  Cut the butter into as small pieces as possible.  Pile loosely on a small plate and freeze while preparing remaining ingredients.

4.  In a large bowl, whisk together the flour, baking powder, and salt.  Add partly-frozen butter and moving quickly, toss and pinch butter into flour with fingertips, tossing the mixture around to be sure to reach all pieces of butter, until the mixture resembles coarse meal.  Large flakes or pea-sized lumps are just fine.

5.  Add the milk mixture to the flour mixture, and fold quickly but gently with a fork or nonstick spatula until all dry ingredients are moistened and a rough dough forms.

6.  Turn the dough out onto a floured work surface.  With floured hands, press the dough together into a cohesive mass.  Liberally dust the top with flour, and fold the dough in half (you may need to use a bench scraper to help with this).

7.  Using a rolling pin, and dusting with flour as needed to prevent sticking, gently roll the dough out to about 1/2 inch thick.  With a round cutter or a small drinking glass, and using a decisive stamping movement, cut as many biscuits as you can, cutting each out as closely as possible to the next one.  Do not twist the cutter.  Transfer the biscuits to the prepared baking sheet.

8.  Gather scraps together by gathering in from the sides, pressing the cut sides together.  Do not re-knead or re-roll for the best results.  Form biscuits from scraps either by hand-shaping or by cutting.  Transfer scrap biscuits to the prepared baking sheet.

9.  Lightly brush the tops of the biscuits with milk.  Bake the biscuits at 400° F for 20 to 25 minutes, or until lightly browned on top.  Let cool on the pan for a minute or so, then transfer biscuits to a wire rack to finish cooling.  Serve warm.


Notes:
1.  Biscuits can be stored at room temperature, wrapped tightly in aluminum foil, for 6 to 8 hours.  Before serving, rewarm in a 350° F oven for 5 minutes.  If not eating within that time, freeze, wrapped in foil.  To serve, bake unthawed and unwrapped, for 10 minutes at 350° F.

2.  You can bake the sweet potatoes up to 2 days in advance, and store in the refrigerator until ready to use.  An added benefit with this approach is that it keeps your liquid mixture cold, so as not to melt the butter, crucial for making tender biscuits.

Posted in Quick Breads, Savory | Leave a comment

Sticky Biscuits

Week Thirty: Biscuits

sticky-biscuits

I know the problem.  You’ve just woken up, and you’ve been stricken with a craving.  Wherever it came from, all you know is you want something sweet and gooey, something bready and spicy.  You want that mouth-watering smell to wake everyone up with high expectations.  Yes, you want cinnamon rolls.  With all speed.  You don’t want cinnamon rolls three hours from now, and you’re certainly in no frame of mind to deal with anything complicated, since even the coffee is taking too long to make.

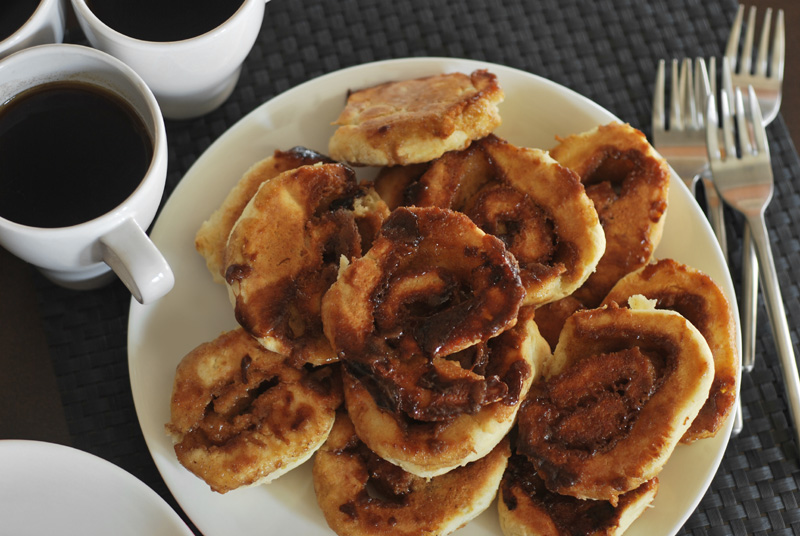
Fortunately, there’s a simple, if slightly ersatz, shortcut.  They’re called sticky biscuits, and they’re a glorious half-way point between biscuits and cinnamon rolls.  Made with a biscuit dough, there’s no waiting for a traditional yeasted cinnamon roll dough to rise, but you still get the warm spice and sweet spiral filling of a cinnamon roll.

I know what you’re thinking here: biscuits are hard!  Didn’t I say these were easy?  Oh, my, yes.  See, the biscuit dough used here has no butter.  Not one bit.  No shortening, either.  That’s right, there’s no solid fat to cut in or mess with at all, totally doing away with the most difficult part of making biscuits.  So how does it work?  The magic ingredient is heavy cream, and it provides all the necessary fat and liquid in one shot. 

With only four ingredients, these biscuits could hardly be simpler.  Of course, without pockets of butter in the dough, they aren’t going to be terribly flaky.  But they do turn out rather fluffy, especially considering how easy they are.  And when rolled around a filling of brown sugar, butter, and cinnamon, they’re simply delightful.

This filling, when baked, melts and runs out of the bottoms of the biscuits.  But rather than being a tragedy, this is exactly what you want.  After baking, the biscuits are inverted onto a plate, allowing the molten filling to turn into a gooey, sticky topping which (to me) eliminates the need for any glaze or icing, as you might drizzle over a pan of cinnamon rolls.

Despite the sugary topping/filling, sticky biscuits are much less sweet than typical cinnamon rolls, because of the lack of icing, and because there is no sugar added to the dough.  If you like, you can certainly add some, but I for one prefer less of a sugar rush, especially early in the day.  One of my guests even remarked that sticky biscuits are better than cinnamon rolls, for this very reason.

The end result is perhaps not quite as pretty as the standard cinnamon roll, but you can enjoy an entire batch of these long before any cinnamon roll is even halfway made.  And when you’re still half-asleep, bleary-eyed and stumbling around the kitchen, speed matters far more than presentation ever will.  Save the cinnamon rolls for Christmas morning.


Sticky Biscuits
Adapted from The Joy Of Cooking
Makes about 12

For filling:
4 tablespoons unsalted butter, melted and cooled slightly
3/4 cup brown sugar, packed
1 teaspoon ground cinnamon
1/8 teaspoon ground allspice

For dough:
9 ounces (2 cups) unbleached all-purpose flour
2 1/2 teaspoons baking powder
1/2 teaspoon salt
1 1/4 cups heavy cream, chilled

1.  Preheat oven to 450° F.  Lightly oil a rimmed baking sheet, or line with parchment paper.  In a bowl, stir all filling ingredients together.  Set aside.

2.  In a large bowl, whisk together the flour, baking powder, and salt.  Add the chilled cream, and stir until the dry ingredients are just moistened, and a rough dough forms.

3.  Turn the dough out onto a floured work surface.  Fold the dough over itself once or twice, or until smooth and even.  Using a rolling pin, and dusting with flour as needed to prevent sticking, gently roll the dough out to a long rectangle, about 10 by 15 inches in size, or between 1/4 and 1/2 inch thick.  Gently spread the filling evenly over the dough.

4.  Starting with one long side, tightly roll the dough up, jelly-roll style.  You may need a bench scraper to help with this step.  Cut the roll horizontally into 1 inch pieces.  Place each piece, cut side up, on the prepared baking sheet.

5.  Bake the biscuits at 450° F for 10 to 12 minutes, or until golden brown.  Immediately transfer the biscuits to a plate, turning them upside down, and drizzling with any extra filling that may be left on the pan.  Let cool for about 5 minutes before serving.


Notes:
1.  These can alternatively be baked in a nonstick cake pan.  Place the cut biscuits in the pan so they touch each other.  Bake as directed, and invert the entire pan at once onto a plate when done.

2.  Be careful not to overbake the biscuits, as the filling will overcook quickly, turning into a hard caramel, rather than a sticky topping.

Posted in Quick Breads, Sweet | Leave a comment

Drop Biscuits

Week Thirty: Biscuits

drop-biscuits

Okay, yes.  I’ve already made biscuitsTwice.  But I’ll be honest: I’ve got houseguests in town.  And since they’re quite lovely people, I don’t want to spend every waking moment making bread, or waiting on bread, or even thinking about bread, really.  I needed a theme for this week that would get me out of the kitchen, one that would let me enjoy their company.  But what?

While pondering this theme-tastic problem over dinner recently, a dear friend of mine proposed “Biscuit Week”.  Sure, I thought, biscuits absolutely fit the bill: they’re quite fast to make, cook in the little time it takes to do the washing up, and hey hey, we get breakfast out of it too!  Perfect!  And yet, how many kinds of biscuits can there be?  I’ve already made fluffy and flaky, what else is there?

Plenty, as it turns out.  A quick search for “biscuit” on Epicurious returns 161 results.  On one website!  Google “biscuit recipe“, and you get about 478,000 results!  Obviously, there’s an awful lot of biscuit out there.  Of course, just by changing one small ingredient, or by varying amounts, you technically create a new recipe, so there aren’t exactly 478,000 different biscuits running around.  But there are at least 6 different kinds (other than simply fluffy and flaky), and that’s all I need.  So thanks to my friend Rion, it’s all biscuit, all the time this week!  (Good thing my houseguests like biscuits, right?)

The first biscuit this week is called a “drop biscuit”, and it does what it says on the tin.  You know, like drop cookies?  The ones you scoop and just drop onto the baking sheet?  Exactly.  With drop biscuits, there’s no rolling, there’s no need for round cutters, there’s no flour all over your counter.  This is precisely why they’re sometimes known as “lazy biscuits”.

Basically, these are made the same way as regular biscuits; that is, cold butter is cut into the flour, and liquid is then added.  (For a more in-depth discussion of that method, see this post about fluffy biscuits.)  But one main difference with drop biscuits is that the dough needs to be wetter, so it will actually drop.  The dough shouldn’t be soupy, but it should be too sticky to knead.

Because of the way drop biscuits are made, they’re not exactly the prettiest biscuits, often squat and unevenly-shaped.  But I’ve often found that the most homely dishes are often the most delicious, and that’s certainly the case here.  Pretty biscuits, ones that have been rolled and carefully cut out, have been handled quite a bit.  This handling can over-produce gluten, which makes your biscuits tough.  Drop biscuits are handled very little – just to mix and scoop – and are therefore generally very tender.  Just take care not to overwork the butter (move quickly!), or overmix the dough, and you’re almost guaranteed success.

You can get more height out of your biscuits by placing the dough so it touches on the baking sheet, which lets the biscuits grab onto each other as they rise in the oven, and makes them taller, as well as moister.  But if you must have those beautiful, deliciously crisp edges on your biscuits, you can space the dough apart; just be prepared for shorter biscuits.

These biscuits are just barely sweet, and go just as well with a plate of beans and rice for dinner as they do with coffee and scrambled eggs for breakfast.  These are everday biscuits, quite easy to throw together, and able to pair with a wide variety of foods.  You can of course vary the flavor by adding herbs or spices – dill or black pepper are classic – but they’re just as good eaten plain, or with a little butter or jam.  They might look a little unkempt and rustic, but they could hardly taste more elegant!


Drop Biscuits
Makes about 15 biscuits

6 to 8 tablespoons cold unsalted butter
9 ounces (2 cups) unbleached all-purpose flour
2 tablespoons sugar
2 1/4 teaspoons baking powder
1/2 teaspoon kosher salt
1 cup cold buttermilk
1/2 teaspoon baking soda

1.  Preheat oven to 425° F.  Grease a rimmed baking sheet, or line with parchment paper.  Cut the butter into as small pieces as possible.  Pile loosely on a small plate and freeze while preparing remaining ingredients.

2.  In a large bowl, whisk together the flour, sugar, baking powder, and salt.  Add partly-frozen butter and very quickly pinch and rub in with fingertips, tossing the mixture around to be sure to reach all pieces of butter, until the mixture resembles coarse meal.  Pea-sized lumps are just fine.

3.  Mix the buttermilk and the baking soda together.  Add buttermilk mixture to the flour mixture, and fold quickly but gently with a fork or nonstick spatula until all dry ingredients are moistened.

4.  Using a large spoon or a portion scoop, drop 1/4 cupfuls of dough onto the prepared baking sheet.  The biscuits will rise taller and be moister if they are dropped touching each other.  If you prefer a crisp-edged biscuit, drop them apart from each other, not touching.  Either way is fine.

5.  Bake biscuits at 425° F for 15 to 20 minutes, or until lightly golden brown on top.  Let cool on the pan for a minute or so, then transfer biscuits to a wire rack to finish cooling.  Serve warm. 


Notes:
1.  Biscuits can be stored at room temperature, wrapped tightly in aluminum foil, for 6 to 8 hours.  Before serving, rewarm in a 350° F oven for 5 minutes.  If not eating within that time, freeze, wrapped in foil.  To serve, bake unthawed and unwrapped, for 10 minutes at 350° F.

Posted in Quick Breads, Savory | Leave a comment

Injera

Week Twenty-Nine: African Breads

injera

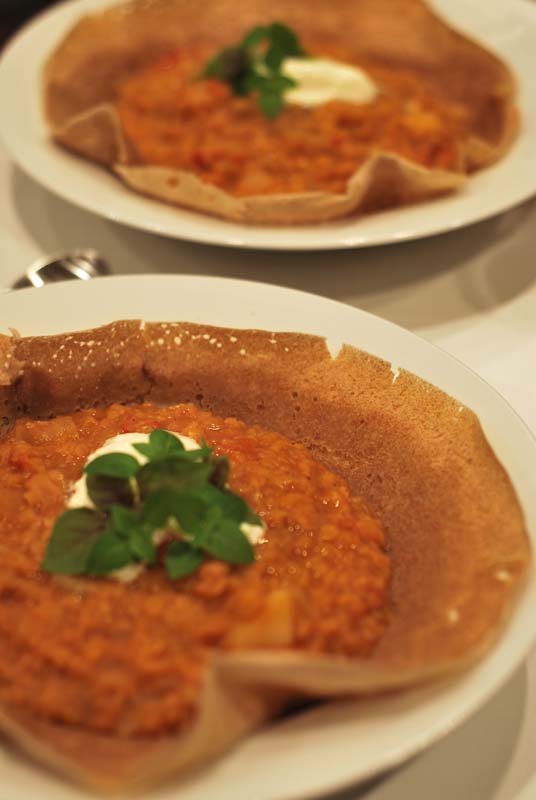
The last bread for this week is one that you’ve surely seen if you’ve ever eaten at an Ethiopian restaurant.  It’s called injera, and it’s that spongy, sour flatbread, likely served underneath your main dish.  In fact, if you’ve eaten at a very authentic place (or actually been to Ethiopia), the injera was probably not only used as the utensils, but also as the tablecloth.  Which you then ate.  With pleasure.

Eaten alone, injera tastes almost too sour, the result of a nearly week-long fermentation process.  But served underneath any number of highly spiced, stew-like dishes, the flavor mellows considerably and provides a delightful complexity to the other food served with and on it.  For this reason, you rarely see injera eaten alone, though it’s not unusual to see a plate of extras on the table.

If making Ethiopian food sounds horribly exotic, perhaps way too far out of your comfort zone, trust me when I say it’s far more familiar than you might think.  Have you ever cooked lentils?  Then you know how to make misir wot (the Ethiopian lentil stew recipe given below)!  Ever made a sourdough starter?  How about crêpes?  If so, you already know everything you need to make injera!

And not only is it more familiar than you might think to make injera, but it’s also incredibly easy.  Like any great bread, there is an excruciatingly long waiting time (it takes at least 5 full days!), but there isn’t anything harder to it than swirling batter around the bottom of a hot pan.  Oh, though I did have some difficulty with the cooked injera sticking to my plates while cooling (step 8 of the recipe, wherein you use a 2-plate system for cooling and stacking the cooked breads).  This was greatly alleviated by oiling the cooling plate first.  I also determined that if you only let it cool on the plate for about 30 seconds, then immediately transfer it to the stack of cooked breads, it releases much more easily.  This will all become more clear once you’re in your own rhythm of cooking the injera.

This bread ended up almost exactly as I recall from my (albeit limited) visits to Ethiopian restaurants, if a little crispier around the edges.  The injera are rather stiff when pulled from the pan, but they soften into that familiar, spongy texture after standing for a minute or two.  And like crêpes, the first one or two injera may not turn out very well.  But if you persevere, you will be rewarded with a plateful of deliciously sour, wonderfully authentic injera, ready to be topped with whatever you like.  I’ve given a recipe for an Ethiopian lentil stew that I enjoyed greatly, and that simmered happily on a back burner while I cooked the injera.  And remember, when in Rome, all that jazz, so try leaving the spoons in the drawer, and eat with your hands!

injera-in-situ

Injera
Adapted from The Sour Dough
Makes about 20

For starter:
3/4 cup water, room temperature
1/2 cup teff flour
1/8 teaspoon instant yeast

For first feeding:
1/2 cup water, room temperature
1/3 cup teff flour

For second feeding:
1/2 cup water, room temperature
1/3 cup teff flour

For final dough:
2 cups all-purpose flour
1/2 teaspoon kosher salt
1 tablespoon baking powder
3/4 cup water, room temperature

1.  Combine starter ingredients in a 4 cup container with a lid, whisking until smooth. Loosely cover the starter with the lid.  Let sit at room temperature for 2 days.

2.  On the third day, whisk the starter.  There should be a grassy, yeasty smell, and small bubbles should rise to the top.  Feed the starter 1/3 cup teff flour and 1/2 cup water.  Loosely cover with the lid, and let sit at room temperature for 2 more days.

3.  On the fifth day, the starter should have separated into distinct layers, should look fizzy, and have a very strong grassy smell.  Feed a second time with 1/3 cup teff flour and 1/2 cup water. Loosely cover and let sit at room temperature for at least 4 hours before continuing.

4.  Whisk the starter. Using a blender or food processor, blend the starter until it no longer feels gritty when rubbed between two fingers, about 2 minutes. Transfer starter to a large bowl.

5.  Add flour, salt, baking powder, and water.  Whisk until smooth, adding any extra water as necessary to achieve the proper consistency.  The batter should be about as thick as heavy cream.  Loosely cover the bowl with plastic wrap, and let sit at room temperature for 4 to 6 hours.

6.  Whisk batter.  If it is has thickened too much, add a little water until the correct consistency is achieved.  Heat a nonstick pan over medium heat.  Lightly oil one flat plate, and set aside.

7.  Pour about 1/4 cup batter into the heated pan, and immediately swirl around to coat the bottom of the pan, as if making a crêpe.  Cook until the surface of the injera is set, and all air bubbles have popped.  Do not turn injera over.

8.  Remove Injera from pan, and transfer to the lightly oiled plate.  Allow to cool briefly, then transfer to a second plate.  Cover with a piece of wax paper.  Repeat with the remaining batter, stacking cooked injera with wax paper in between to prevent sticking.

Bonus recipe!

Misir Wot (Spicy Lentil Stew)
Serves 4

2 tablespoons olive oil
1 medium onion, chopped
2 cloves garlic, minced
1 tablespoon ginger (about a 1 inch knob), minced or grated
1 to 2 tablespoons berberé, from this recipe
1 cup red lentils, rinsed
1 large tomato, chopped
1 1/2 cups vegetable stock
2 teaspoons balsamic vinegar
Salt and black pepper, to taste

1.  In dutch oven or large pot, heat the olive oil over medium heat.  Sauté the onion until soft and lightly browned, about 10 minutes.

2.  Add garlic, ginger, and berberé, and cook until fragrant, about 1 minute.

3.  Add the lentils and cook for about 1 to 2 minutes, stirring to prevent burning.  Add the tomato and the vegetable stock.  Bring to a boil, and simmer for 15 to 20 minutes, or until the lentils are soft and the stew is thickened.  Add the vinegar, and season with salt and pepper to taste.  Serve warm over injera.

Notes:
1.  This injera recipe makes just enough starter for one recipe.  If you want to keep some starter for continuous injera-making, you’ll need to add an additional two days to the process.  On the fifth day (after the second feeding), instead of adding the all-purpose flour and other ingredients, just wait an extra two days before continuing.  On the seventh day, feed the starter again (with 1/3 cup teff flour and 1/2 cup water).  Continue with step 4, using 2 cups of the starter, and reserving the rest.  Feed the remainder as you would with a new starter.

2.  The injera froze beautifully, stacked with wax paper in between each one.  It thawed quickly under some misir wot, simply heated in the microwave.

3.  Teff flour is crucial to the characteristic texture of injera, and can be found at many natural foods stores (*cough* whole foods *cough*).

Posted in Savory, Yeast Breads | 2 Comments

South African Rusks

Week Twenty-Nine: African Breads

rusks

Today’s bread actually comes to us from the Netherlands, via South Africa.  As you may be aware, a certain percentage of the population of South Africa is of Dutch lineage; and if you’ve studied your history books, you know this is ultimately because of pepper.  Yes, plain old black pepper.

See, back in the 1500s, Europeans had gotten their first tastes of those fascinating foods called “spices”, and they liked what they tasted.  (Because, you know, spices are delicious.)  Black pepper was a firm favorite, and people just couldn’t get enough.  Literally.  At that time, the Portuguese (allied with the Spanish and the Germans) had pretty much full control over the spice trade; but unfortunately, they weren’t very efficient.  So while demand grew for spices, black pepper in particular, the supply remained scarce, and therefore the price went sky-high.

The Dutch, miffed about being cut out of the whole deal, decided to start their own spice-trading company, and the Dutch East India Company (a.k.a. the VOC) was formed.  It ended up being so much more efficient (oh, and horribly violent) than the Portuguese system that they had basically full control of most spice-trade routes in Southeast Asia and Indonesia within 50 years.

In 1652, needing a decent half-way point, Jan van Riebeeck of the VOC settled an outpost in South Africa, which later became Cape Town.  More and more Dutch eventually settled there, followed by the British, Germans, and French looking for their own piece of the action.  Violence ensued.

Violence aside, all those people still needed to eat, and so an old sailor’s trick was adapted to living on dry land (some of it really dry): the biscuit.  Etymologically speaking, “biscuit” means “twice-cooked”.  You know, like biscotti or zwieback, both literally meaning “twice-cooked”.  By removing all the moisture from a bread, it keeps for ages longer than it would under normal circumstances.  And so, the European settlers began baking rusks as a way of preserving bread in the arid South African climate.

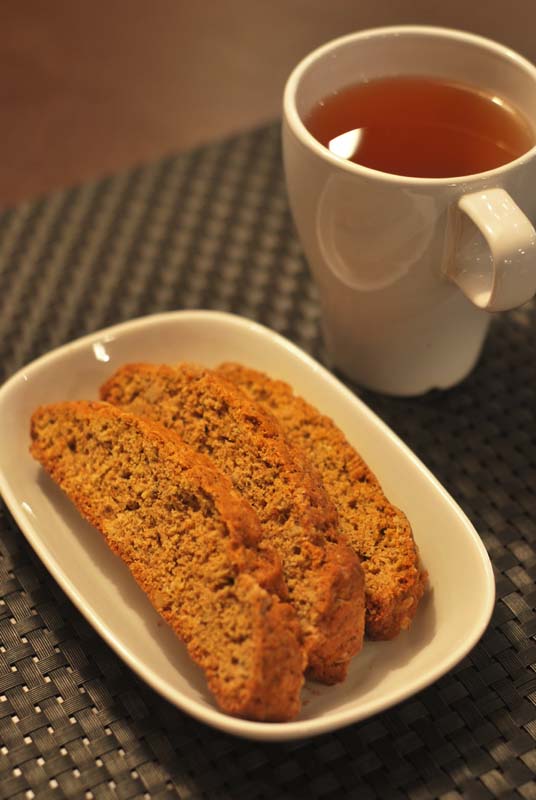
Throughout all the political and cultural strife that has notoriously plagued that country, the rusks have remained.  But unlike the more familiar Holland rusks, or the British style of rusk, which are both plain and decidedly boring, South African rusks have nothing bland about them.  They’re more akin to the Italian biscotti, though not quite as sweet.  Much like biscotti, South African rusks are usually dipped in coffee or tea, specifically rooibos (or redbush) tea.   Historically homemade, rusks are now produced by several companies (though there is one extremely popular brand in particular).

Essentially a twice-baked quick bread, these rusks are quite fast to whip up – but the drying time is what takes the most patience.  Many recipes call for a 4 hour drying (re-baking) time, but I’ve seen times up to 8 hours.  This, of course, also depends on how thick you make them, how much moisture was in the dough, and how humid your weather is.  I found mine dried out well in about 4 hours of re-baking time (see note 1 below).

Though you can make these rusks plain, I like to add a little flavor to mine.  Here, I’ve used rolled oats, sesame seeds, and poppy seeds, purely because I like those flavors, not for any real authenticity.  Raisins are quite customary, so add those if you like.

These rusks turn out quite crunchy, with not a bit of toughness anywhere.  They’re delightfully crisp, and are really just lovely with a cup of tea, as most South Africans already know.  Despite the similarities to biscotti, they’re grainier and far less sweet, which may not sound impressive, but it greatly appeals to me.  They’re like biscotti’s rustic country cousin, a little less refined, but just as incredibly tasty.

Not to mention, rusks are certainly better for you than the average cookie.  If you’re in the habit of serving tea, or want to impress any coffee-drinking coworkers, give these a shot.  They’re crunchy, endlessly variable, and rather addictive.  Make a batch just to have on hand if you want; they’ll keep almost indefinitely.  But fair warning – once you’ve made them, you may be asked to make them more often than your schedule will allow.  In that case, maybe give a nod to more violent times, throw in a generous handful of black pepper, and insist you don’t know what happened.


South African Rusks
Adapted from the Tuningi Game Lodge, South Africa, via London Foodie In New York
Makes about 30 big rusks

1 stick unsalted butter, melted and cooled slightly
12 ounces (about 2 1/2 cups) whole wheat flour
9 ounces (about 2 cups) unbleached all-purpose flour
1/2 cup granulated sugar
1/4 cup brown sugar
1 teaspoon kosher salt
1 teaspoon baking powder
1 teaspoon baking soda
1/2 cup regular rolled oats (not quick-cooking)
1/4 cup sesame seeds
1 tablespoon poppy seeds
1/2 cup vegetable oil
1 cup buttermilk
1 egg, lightly beaten

1.  Preheat the oven to 350º F.  Line a large baking sheet with parchment paper, or lightly oil it.

2.  In a glass measuring cup, melt the butter.  Set aside to cool slightly.  While cooling, whisk together the flours, sugars, salt, baking powder, baking soda, oats, sesame seeds, and poppy seeds in a large bowl.  Set aside.

3.  To the butter, add the oil and egg, and stir until combined.  Add the buttermilk, and stir to blend.  Add the buttermilk mixture to the flour mixture, and mix just until all dry ingredients are moistened.  Dough should be moderately stiff.

4.  Turn mixture out onto the prepared baking sheet.  Using floured hands, shape gently into one or two long, thin logs that are as long as the pan will allow.  Try to give each log some height, as it may spread a little in the oven.  Do not flatten or compress them.

5.  Bake the logs at 350º F for 45 to 60 minutes, or until golden brown, and a skewer inserted in the center comes out clean.  Let the logs cool on the sheet pan on a rack.

6.  Turn the oven temperature down to 200º F.  Cut each log crossways into pieces about 1/2 inch thick.  Transfer each piece, cut side up, back on the baking sheet.  You may need a second baking sheet for this step.

7.  Bake rusks a second time at 200º F for at least 4 hours, or until thoroughly dried out and crisp, turning rusks over halfway through baking.  Let rusks cool on baking sheets when done.  Properly dried, rusks will keep indefinitely at room temperature.


Notes:
1.   I baked my rusks for about 4 hours, then simply turned the oven off and let them sit while I was busy with other things.  However, I had let the baked and uncut log sit overnight before re-baking, which likely dried it out a bit.  If you’re re-baking them immediately after making, or if your weather is very humid, it may take longer to dry properly.

2.  You can use any proportion of wheat to white flour you like; the one given worked well for me.

3.  Feel free to use any seasonings you like: aniseed and muesli (or granola) are very traditional, but switch it up however you like.  Add other seeds or raisins, omit the oats, whatever you prefer.

4.  I shaped my dough into one big log, which produced rather large rusks (about the size of those monster biscotti you often see in coffee shops).  Next time, I would probably shape the dough into two thin logs in order to make more bite-sized rusks, better suited to snacking on, and faster to dry out.

Posted in Quick Breads, Savory, Sweet | 2 Comments