Week Twenty-One: Gluten-Free Breads
I know, I know, I’ve made beer bread not once, but twice already. But they were different both times, and this third time is different-er still. This time, it’s not a quick bread, which kind of hurts me a little. I mean, it’s beer bread! It’s supposed to be extremely fast, and extremely good, right?
Well, not this time, unfortunately. The only thing this recipe has in common with that classic, favorite beer bread recipe is the beer. Wait, no it doesn’t, either! This has to use special gluten-free beer! I guess, then, the only thing it has in common is… um, butter and sugar. That’s a bit like calling a cookie and a slice of cake the same thing.
So we’ve got butter and sugar, and everything else had to be scrapped, including the one major selling point of my beloved beer bread: the ease and speed of the thing. It seems like a sacrilege to go from such speed to such plodding slowness, and still call it “beer bread”, hence the word “yeasted” in the recipe title. I like to differentiate. (Yes, I’m aware that I’m comparing apples to oranges in comparing the two breads.)
So it is more of a time-investment, but sadly, the reward is less than enticing. Please know that I’m a huge fan of slow food (as many hungry and patient dinner guests of mine know), and I generally believe that the best things in the kitchen take some time. But I don’t believe in waiting ages for something sub-par.
Not that this is a bad bread, exactly; the flavor was basically good, and the texture was actually quite convincingly similar to a wheat-flour bread, but it just tasted somehow flat. (I compensated for that, while writing the recipe out, by upping the salt a little. Maybe it will come out better for you.)
I understand that I’m not selling this bread very well. In fact, I may well be angering (or at least annoying) a few celiacs out there, with my devotion to my gluten-filled and off-limits beer bread. But I feel incapable, with my limited experience, of judging gluten-free breads against other gluten-free breads. Honestly, this week is the first time I’ve ever tried making the stuff, and I’ve never needed to buy it. I can only compare to what I know; and what I know has gluten stretching from here to Timbuktu (figuratively speaking).
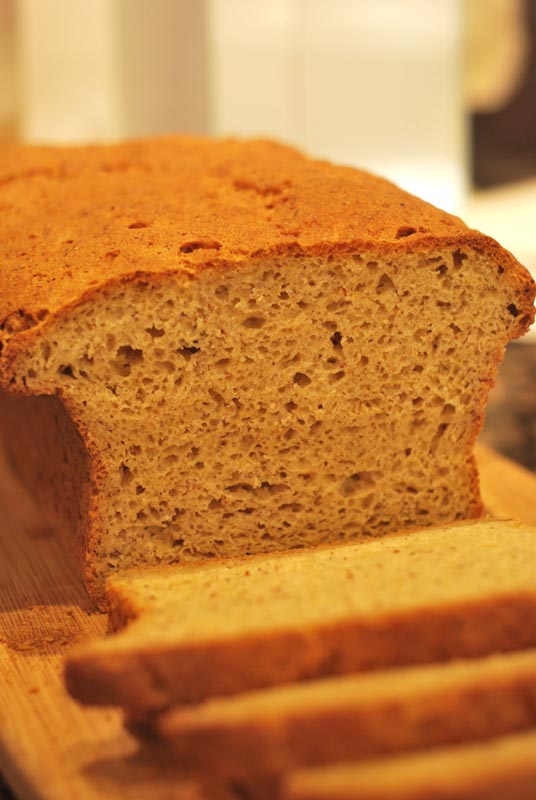
So all said and done, this may be a very good option for celiacs. This bread did end up with a nice crust, tender crumb, and was not at all heavy, dense, or dry. Each slice had a nice array of air pockets, of even size. The flavor was quite reminiscent of classic beer bread – a little sweet, a little buttery, a little complex, yet mild – but it did taste flat. It was very easy to slice, though, so I imagine it would make great sandwiches. But would I make it again, considering I am not a celiac? Probably not. *Gallic shrug.*
Gluten-Free Yeasted Beer Bread
Adapted from Natalie Naramor, at Gluten-Free Mommy
Makes 1 large or 2 small loaves
1 cup sorghum flour
1 cup white rice flour
1 cup tapioca flour (starch)
1/2 cup certified gluten-free oat flour (see note 1 below)
1/2 cup cornstarch
1/4 cup flaxseed meal
1/4 cup brown sugar
1 tablespoon xanthan gum
2 teaspoons kosher salt
2 1/4 teaspoons instant yeast (1 packet)
5 tablespoons unsalted butter, melted and cooled slightly
1 bottle (12 ounces) gluten-free beer, room temperature
1 teaspoon white vinegar
2 tablespoons molasses
1 whole egg plus 3 egg whites
1. Grease a large (10 x 6) loaf pan, or two small (7 x 4) bread pans. In the bowl of a stand mixer, whisk together the flours, cornstarch, flaxseed, sugar, xanthan gum, and salt. Whisk in the yeast.
2. Combine the butter, beer, vinegar, and molasses, and stir until the molasses have dissolved. Add to the flour mixture in the bowl. Add half of the egg mixture, and mix with the paddle attachment until incorporated, scraping the bowl if necessary. If the mixture looks dry, add the remaining egg by tablespoons until the consistency resembles cake frosting, or thick batter. It should hold its shape, and not be runny. Continue to beat at medium speed until dough is smooth, scraping bowl down as needed.
3. Scrape the dough into the loaf pan, or divide between the two loaf pans. Using a nonstick or oiled spatula, smooth the tops. Loosely cover dough with oiled plastic wrap, and let rise in a warm place until doubled in size, about 1 1/2 hours.
4. 30 minutes before baking, preheat the oven to 350° F. Bake the bread until baked through, and the top is golden brown, about 40 to 50 minutes. Remove bread from pans, and transfer to a wire rack to cool.
Notes:
1. Oats are still considered of dubious safety for many celiacs, even if the oats are certified gluten-free, so proceed at your own judgement. Regular oats are very easily (and are, in nearly all cases) contaminated with gluten, and should be avoided like wheat.
2. Be sure your beer is gluten-free! Most are not; when in doubt, leave it out. You can substitute club soda, for a non-alcoholic option, if you like.

