Since I gave such a thorough discussion of the bread-making process yesterday, I thought I’d finish out the week with variations on that theme. Which is to say: breads with similar recipes and procedures, but with very different outcomes, based on how the process is manipulated, mostly with time and shaping.
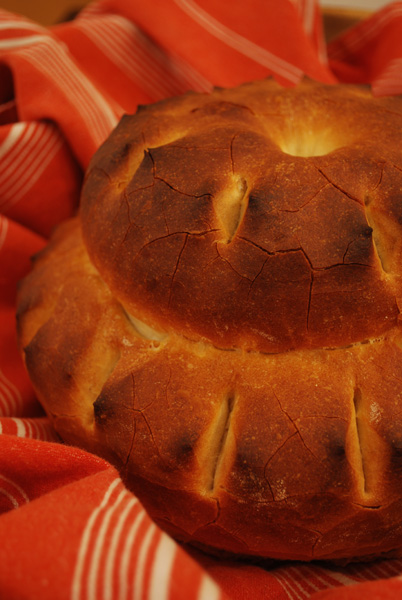
Yesterday, I gave you a recipe for a French bread, shaped like a baguette, and fermented and proofed for a fairly standard time period. Today, I bring you what my cookbook calls simply “Cottage Loaf”, a bread with a home-y flavor, yet pretty enough to be a centerpiece for any important meal. And honestly, I found it just as easy to shape as a baguette. (I always found long, droopy lengths of dough awkward to move around. Here, you just move two balls around. Simple!) What you end up with is a shape reminiscent of a king’s crown, or maybe a short snowman, depending on your point of view. And while the actual ingredients are nearly the same, and the doughs have similar flavors, the finished product is worlds apart from yesterday’s French bread.
I always loved that about bread: how you can take the same basic building blocks, and create infinite variations based on proportion, shape, and time. That’s a major reason I feel no one should be afraid to make bread; so what if your ciabatta didn’t turn out quite like you intended? Maybe it turned into a very fine pugliese instead! (And even if it didn’t, just tell people that’s what you meant. No one will question you if you use hard-to-pronounce words like that.)
This recipe features something unusual when the “baking” step comes around. You put the dough into the cold oven just as you turn it on, rather than letting it preheat completely. I can’t honestly say whether or not I’ve ever seen another bread recipe that does that; so, of course, I assumed I knew what I was doing, and put the dough into a hot oven. This is why you always read new recipes completely, no matter what! Argh, lesson learned. My bread turned out a little brown on the edges, and a bit dense. But it tasted good, and it sure was pretty! I guarantee this bread will impress just about anyone you serve it to. If you can manage it, try to time the baking so that your guests can see and hear you pull it out of the oven. Yes, hear – the crust should “sing” to you, crackling happily as it cools.
Cottage Loaf
Adapted from Bread by Christine Ingram and Jennie Shapter
Makes 1 large round loaf
1 1/2 Lb (6 cups) unbleached white bread flour
2 teaspoons salt
2 1/4 teaspoons active-dry yeast
1 2/3 cups lukewarm water (105 – 110 degrees F)
1. Lightly grease a large baking sheet (or line with parchment).
2. Mix the yeast with 2/3 cup of the water until dissolved. Let stand 5 or 10 minutes, or until foamy.
3. Sift or whisk the flour and salt together in a large bowl, and make a well in the center. Pour yeast mixture and remaining water into center of the flour, and mix to a firm dough.
4. Knead on a lightly floured surface for 10 minutes or until smooth and elastic. Place in a lightly oiled bowl, cover with lightly oiled plastic wrap, and leave to rise in a warm place for about 1 hour, or until doubled in bulk.
5. Turn out onto a lightly floured surface and punch down lightly. Knead for 2-3 minutes, then divide into two balls: one with 1/3 of the dough, and the other with 2/3 of the dough.
6. Place the balls of dough on the prepared baking sheet. Cover with inverted bowls or lightly oiled plastic wrap and leave to rise in a warm place for about 30 minutes.
7. Gently flatten the top of the larger round of dough and, with a sharp knife, cut a cross in the center, about 1 1/2 inches across. Brush or sprinkle with a little water and place the smaller round on top.
8. Carefully press a hole through the middle of the top ball, down into the lower part, using your thumb and first two fingers of one hand. Cover with lightly oiled plastic wrap and leave to rest in a warm place for about 10 minutes.
9. Turn the oven on to 400 degrees F and immediately place the bread on the lower shelf. It will finish expanding as the oven heats up. Bake for 35 – 40 minutes, or until golden brown and sounding hollow when tapped. Cool at least 15 minutes on a wire rack before serving.
Notes:
1. To ensure a good-shaped loaf, the dough needs to be firm enough to support the weight of the top ball.
2. Do not let the dough sit too long on the second rise, or the loaf may topple over when baked. But even if it does, it will still taste good!
3. I mistakenly let the oven heat up all the way before putting the dough in. The crumb turned out very dense, with tiny holes, but the flavor was still very good.
4. To get the lovely little slits around the outside, use a clean pair of kitchen shears to cut vertically into the dough. Don’t be shy; the extra surface area allows for more expansion as it bakes, and therefore more lovely crust.

